By: Team AY1920S1-CS2103T-W13-2 Since: September 2019 Licence: MIT
- 1. Introduction
- 2. Setting up
- 3. Design
- 4. Implementation
- 5. Documentation
- 6. Testing
- 7. Dev Ops
- Appendix A: Product Scope
- Appendix B: User Stories
- Appendix C: Use Cases
- Appendix D: Non Functional Requirements
- Appendix E: Glossary
- Appendix F: Product Survey
- Appendix G: Instructions for Manual Testing
1. Introduction
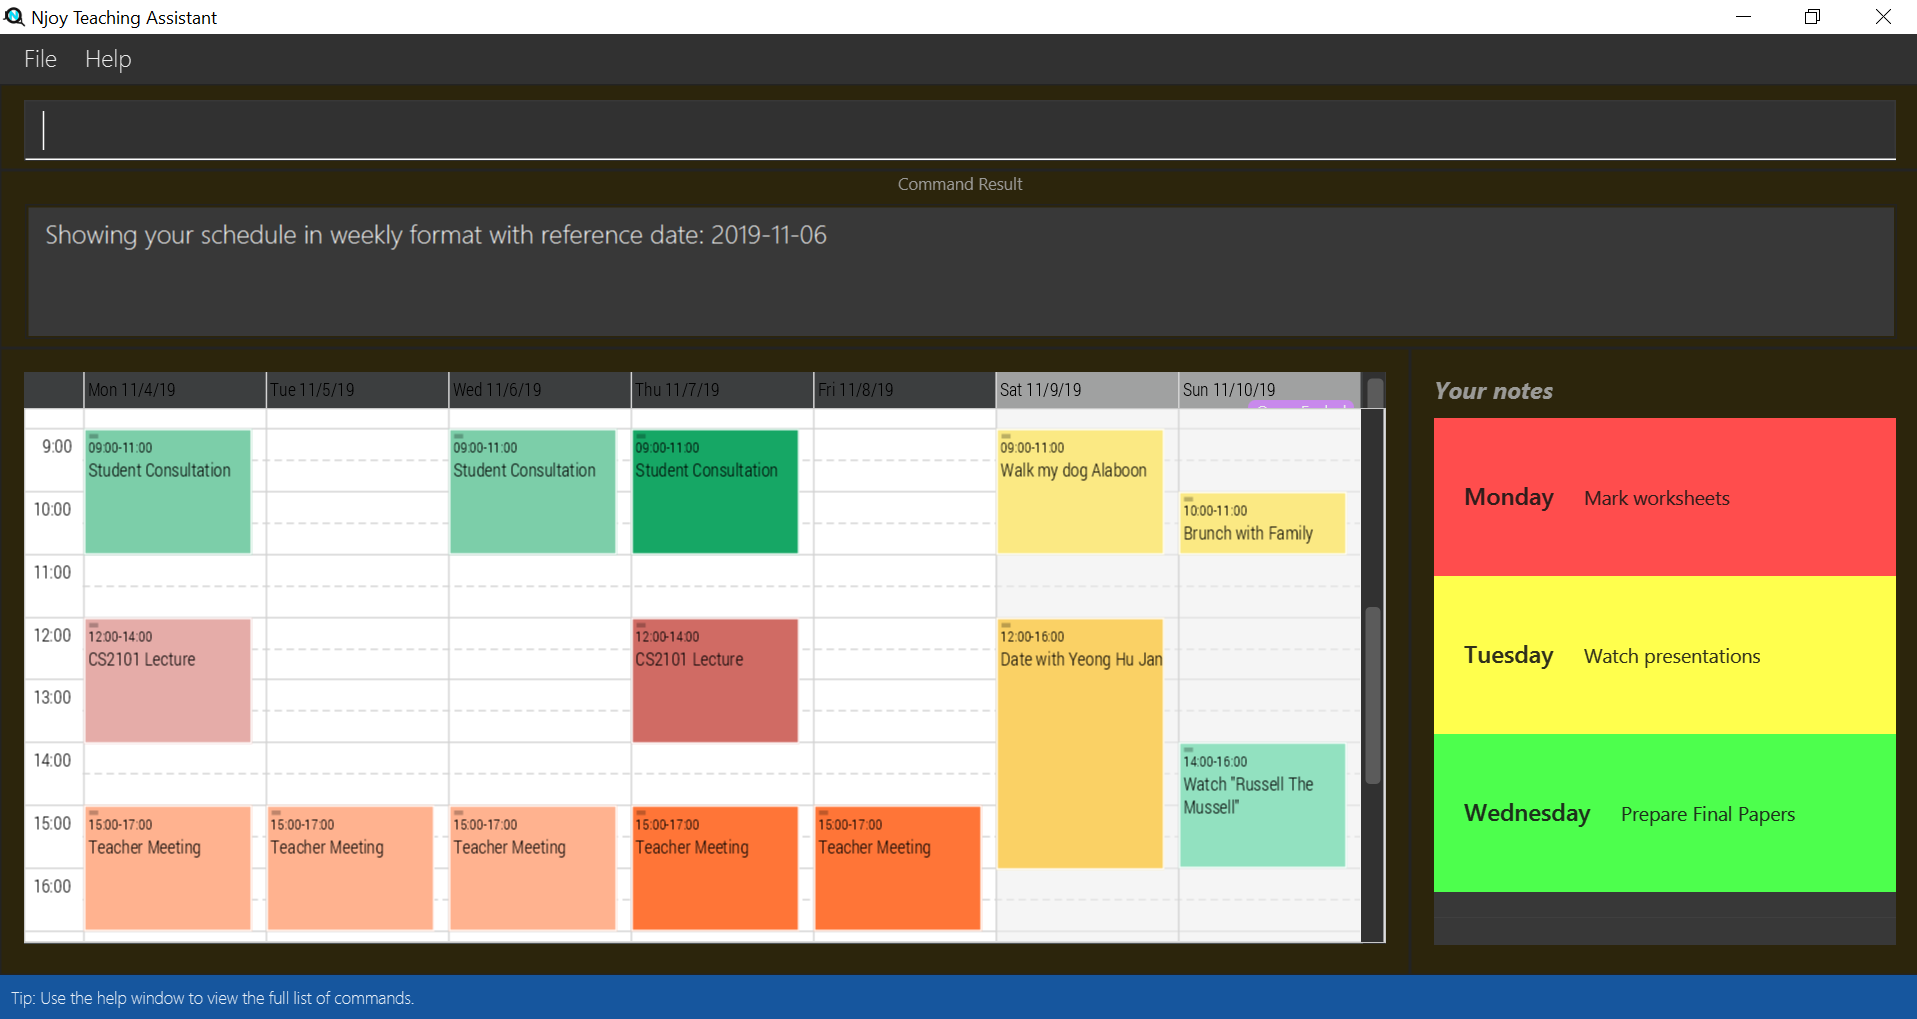
Njoy is a teacher assistant designed to manage teacher’s daily tasks such as generating quizzes, managing classes and viewing grades reports.
Shown below is the GUI of Njoy Teaching Assistant:
This documentation serves as an introduction to the architecture and implementation of Njoy, and is made for developers who wish to maintain, modify or understand the software development behind our application. We adopted the top-down approach; we will first look into high-level architectures before exploring implementation details of each feature.
We encourage you to traverse the full path from the high level design to the implementation details of the feature you are interested for the most complete understanding.
2. Setting up
Refer to the guide here.
3. Design
3.1. Architecture
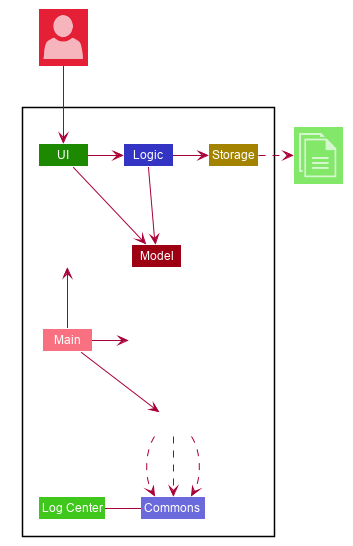
The Architecture Diagram given above explains the high-level design of Njoy. Given below is a quick overview of each component.
| The diagrams drawn can be found in the images folder and the diagrams folder. Refer to the Using PlantUML guide to learn how to create and edit diagrams. Draw.io was also used to create and edit UML diagrams. |
-
At app launch: Initializes the components in the correct sequence, and connects them up with each other.
-
At shut down: Shuts down the components and invokes cleanup method where necessary.
Commons represents a collection of classes used by multiple other components.
The following class plays an important role at the architecture level:
-
LogsCenter: Used by many classes to write log messages to the App’s log file.
The rest of the App consists of four components.
Each of the four components
-
Defines its API in an
interfacewith the same name as the Component. -
Exposes its functionality using a
{Component Name}Managerclass.
For example, the Logic component (see the class diagram given below) defines it’s API in the Logic.java interface and exposes its functionality using the LogicManager.java class.
How the architecture components interact with each other
The Sequence Diagram below shows how the components interact with each other for the scenario where the user issues the command {Entity Name} delete 1.
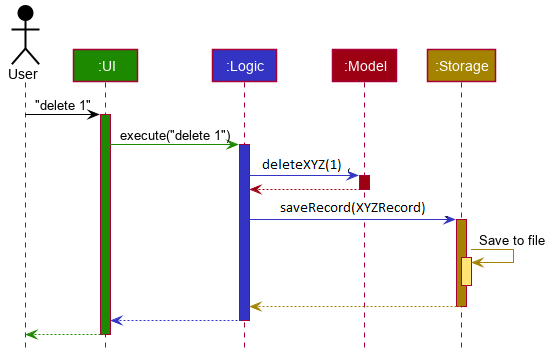
XYZ delete 1 command.The sections below give more details of each component.
3.2. UI component
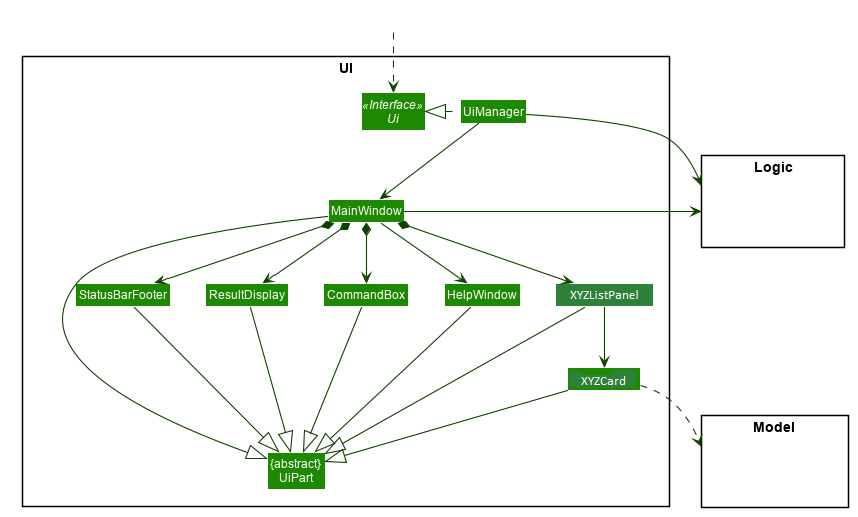
API : Ui.java
The UI consists of a MainWindow that is made up of parts e.g.CommandBox, ResultDisplay, XYZListPanel, StatusBarFooter etc. All these, including the MainWindow, inherit from the abstract UiPart class.
The UI component uses JavaFx UI framework. The layout of these UI parts are defined in matching .fxml files that are in the src/main/resources/view folder. For example, the layout of the MainWindow is specified in MainWindow.fxml
The UI component,
-
Executes user commands using the
Logiccomponent. -
Listens for changes to
Modeldata so that the UI can be updated with the modified data.
3.3. Logic component
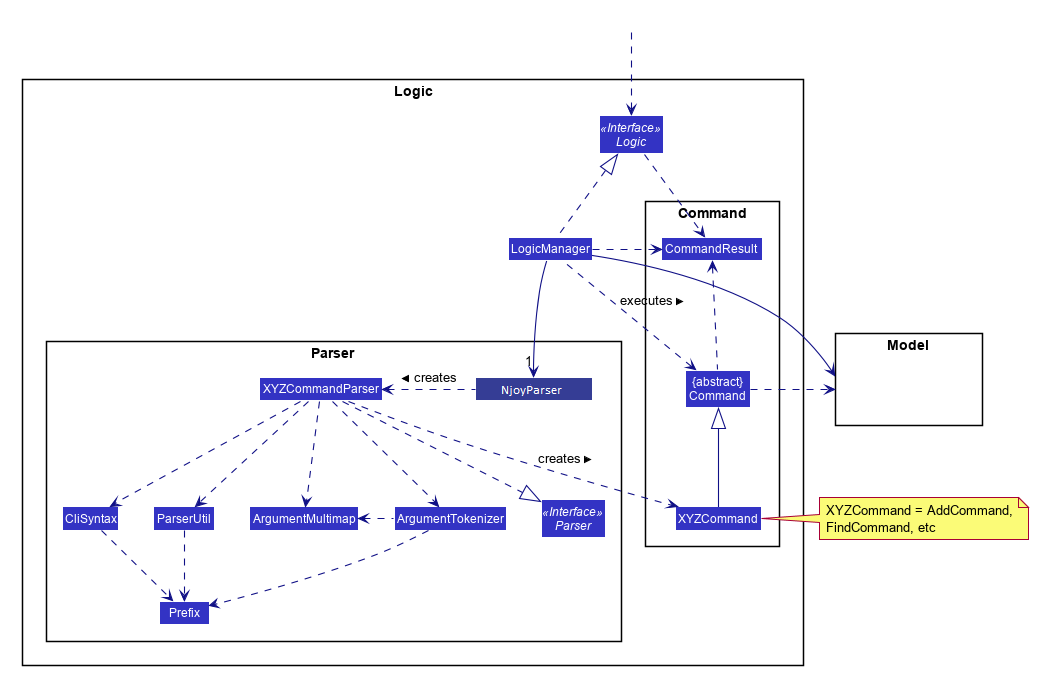
API :
Logic.java
-
Logicuses theNjoyParserclass to parse the user command. -
This results in a
Commandobject which is executed by theLogicManager. -
The command execution can affect the
Model(e.g. adding a student). -
The result of the command execution is encapsulated as a
CommandResultobject which is passed back to theUi. -
In addition, the
CommandResultobject can also instruct theUito perform certain actions, such as displaying help to the user.
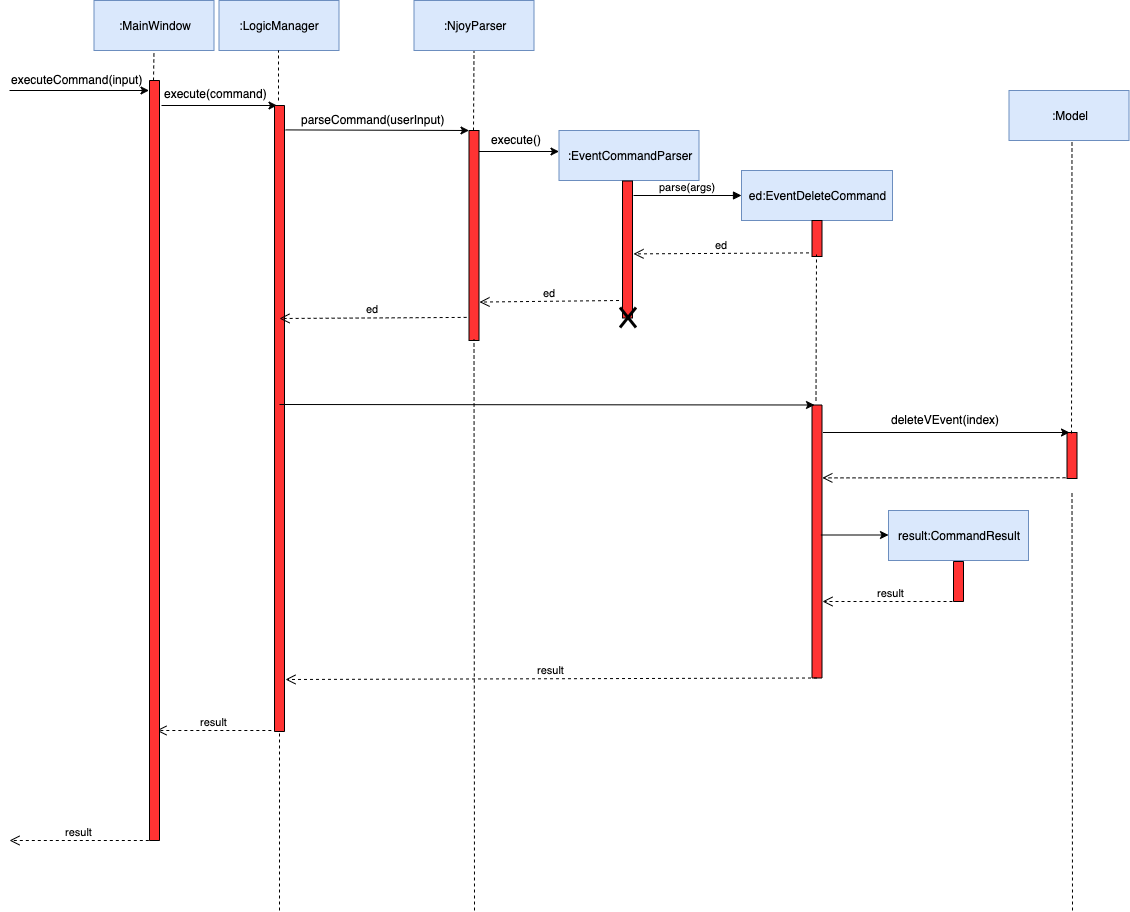
Given below is the Sequence Diagram for interactions within the Logic component for the execute("{Entity Name} delete 1") API call.
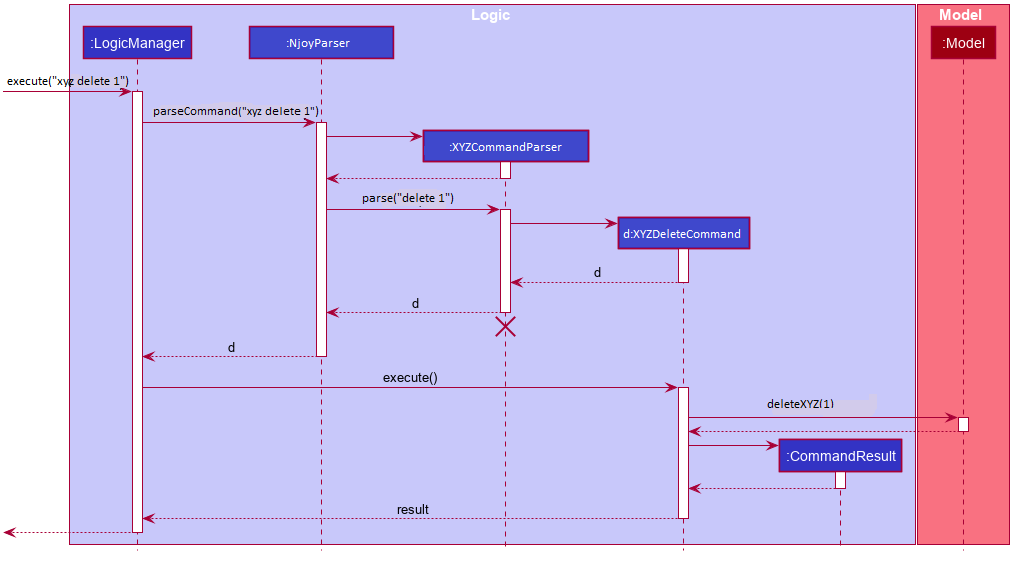
{Entity Name} delete 1 Command
The lifeline for XYZCommandParser should end at the destroy marker (X) but due to a limitation of PlantUML, the lifeline reaches the end of diagram.
|
3.4. Model component
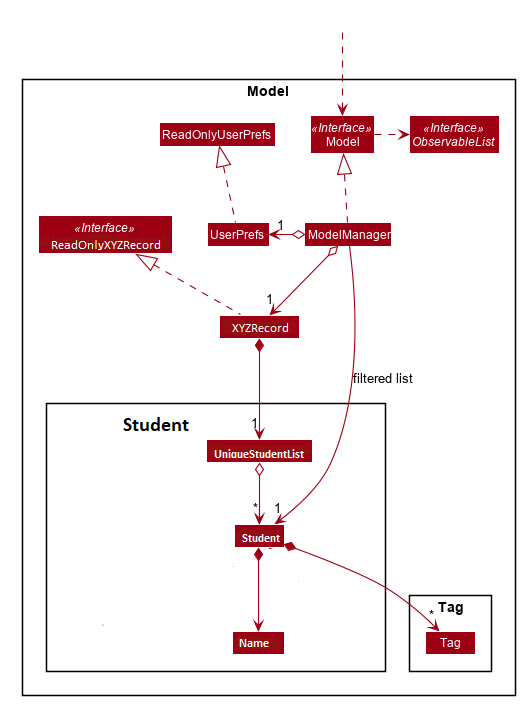
Student Entity as an example.API : Model.java
The Model,
-
stores a
UserPrefobject that represents the user’s preferences. -
stores the data of the different entity records.
-
exposes an unmodifiable
ObservableList<XYZEntity>that can be 'observed' e.g. the UI can be bound to this list so that the UI automatically updates when the data in the list change. -
does not depend on any of the other three components.
3.5. Storage component

API : Storage.java
The Storage component,
-
can save
UserPrefobjects in json format and read it back. -
can save the different entity records data in json format and read it back.
3.6. Common classes
Classes used by multiple components are in the seedu.addressbook.commons package.
4. Implementation
This section describes some noteworthy details on how certain features are implemented.
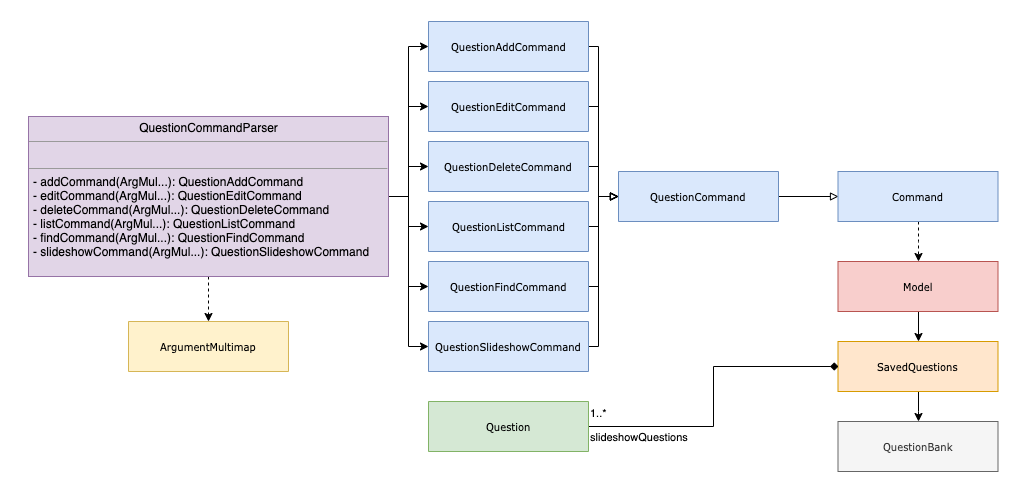
4.1. Question feature
The question feature utilises the QuestionCommandParser class to parse the user command input into the different
command types and validates the input. There are two types of questions OpenEndedQuestion and McqQuestion which
extends the Question class. Questions are then added into the QuestionBank#questions observable list.
The feature comprises of five commands namely,
-
QuestionAddCommand- Adding questions -
QuestionEditCommand- Editing questions -
QuestionDeleteCommand- Deleting questions -
QuestionListCommand- Listing questions -
QuestionFindCommand- Finding questions -
QuestionSlideshowCommand- Starting a slideshow (See slideshow feature)
The commands when executed, will interface with the methods exposed by the Model interface to perform the related operations
(See logic component for the general overview).
4.1.1. Add command
Implementation
The following is a detailed explanation of the operations QuestionAddCommand performs.
Step 1. The QuestionAddCommand#execute(Model model) method is executed and it validates type of question defined.
The type defined will dictate if the resulting question will be a OpenEndedQuestion or McqQuestion question type.
Step 2. The question is then searched through the QuestionBank#questions list using the Model#hasQuestion(Question question) method
to check if the question already exists. If the question already exists, CommandException will be thrown with the error message.
Step 3. The method Model#addQuestion(Question question) will then be called to add the question and the question added,
will be appended with the QuestionAddCommand#MESSAGE_SUCCESS constant and a new CommandResult will be returned with the message.
4.1.2. Edit command
Implementation
The following is a detailed explanation of the operations QuestionEditCommand performs.
Step 1. The QuestionEditCommand#execute(Model model) method is executed and it checks if the Index defined when
instantiating QuestionEditCommand(Index index, HashMap<String, String> fields) is valid.
Since it is optional for the users to input fields, the fields not entered will reuse the existing value currently defined in
the Question object.
| If the question type is changed from open ended to mcq, it is necessary for the user to define all four options i.e a/ b/ c/ d/. |
Step 2. A new Question with the updated values will be created and the question is then searched through the QuestionBank#questions list
using the Model#hasQuestion(Question question) method to check if the question already exists. If the question already exists, CommandException will be thrown with the error message.
Step 3. The newly created Question will replace the existing question object through the Model#setQuestion(Index index, Question question) method
at the specified Index defined by the user.
Step 4. A success message with the edited question, will be appended with the QuestionEditCommand#MESSAGE_SUCCESS constant
and a new CommandResult will be returned with the message.
4.1.3. Delete command
Implementation
The following is a detailed explanation of the operations QuestionDeleteCommand performs.
Step 1. The QuestionDeleteCommand#execute(Model model) method is executed and it checks if the Index defined when
instantiating QuestionDeleteCommand(Index index, HashMap<String, String> fields) is valid.
Step 2. The Question at the specified Index is then removed from the ObservableList of QuestionBank#questions through
the Model#deleteQuestion(Index index) method.
Step 3. A success message with the deleted question, will be appended with the QuestionDeleteCommand#MESSAGE_SUCCESS constant
and a new CommandResult will be returned with the message.
4.1.4. List command
Implementation
The following is a detailed explanation of the operations QuestionListCommand performs.
Step 1. The QuestionListCommand#execute(Model model) method is executed. No validation is necessary here since it
does not write to the question list.
Step 2. The Model#getQuestionsSummary() method is then called and the questions are returned as a String to the new CommandResult
object.
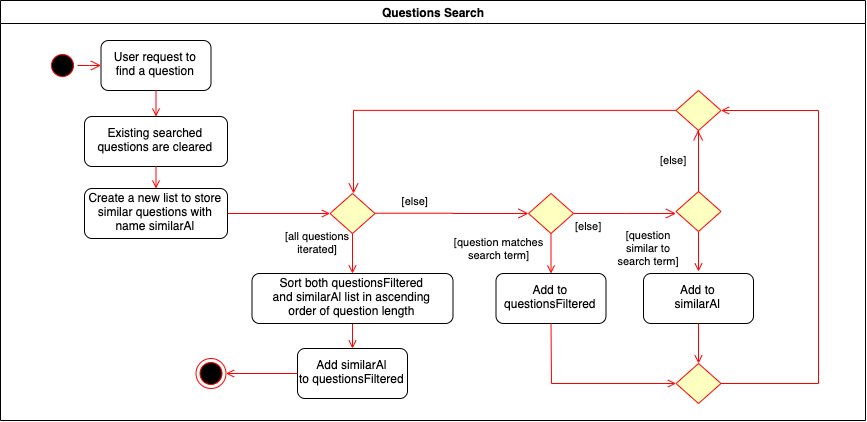
4.1.5. Find command
Implementation
The following is a detailed explanation of the operations QuestionFindCommand performs.
Note that questions searched using this command has it’s own ObservableList stored under QuestionBank#questionsFiltered.
|
Step 1. The QuestionFindCommand#execute(Model model) method is executed. No validation is necessary here since it
does not write to the question list.
Step 2. The method QuestionBank#searchQuestions(String textToFind) is then called through the Model#searchQuestions(String textToFind) method.
Step 3. The existing QuestionBank#questionsFiltered is cleared in case there are existing questions from a previous search. A temporary ArrayList<Question> similarAl to store Question objects
is also created to store similar questions.
Step 4. The QuestionBank#questions list is iterated once and the search is performed on the user’s search term using 2 levels of searching.
Firstly, the question is tested to see if it matches the search term using the StringUtils.containsIgnoreCase(…) method.
Next, if the search term is not found, we test the question to see if it is similar to the user’s search term using the LevenshteinDistance method
that implements the Levenshtein distance formula with a threshold of 40 percent (See Section 4.1.6.3, “Similarity Threshold”).
Step 5. The questions are then duplicated with their index appended to the question in order to keep a separate reference from the main QuestionBank#questions list.
Questions that matches the search term will be added to the QuestionBank#questionsFiltered list whereas for similar questions,
they will be added to the temporary similarAl list instead.
Step 6. Both the QuestionBank#questionsFiltered and similarAl list is then sorted in ascending order of their question length.
Step 7. The similarAl list is then appended to the QuestionBank#questionsFiltered list.
Step 8. A new CommandResult will be returned with a message stating the search term and the number of results returned.
4.1.6. Design Considerations
The following are the various design choices made regarding the feature and alternatives that were considered prior to implementation.
Command Syntax
-
Current Implementation:
-
Current implementation of the commands follows the command word syntax e.g question followed by the arguments necessary to execute the add, edit, delete, list and slideshow command.
-
-
Alternatives Considered:
-
Usage of a forward slash
/and then the command word. Although it makes it clearer that the input is a command, we realised it is redundant as the only input will be commands and will make it more tedious for the user.
-
Command Length
-
Current Implementation:
-
Commands are currently shortened as much as possible through the use of initials without much loss in clarity. For example, instead of using optionA/ to denote the first option, we use a/ instead. Although this may be unfamiliar to the user initially, it should be easy to pick up and will make it less tedious during input.
-
-
Alternatives Considered:
-
Using more descriptive terms as arguments such that each argument will be specified clearly. However, this decreases the user experience as the command will be too long.
-
Similarity Threshold
-
Current Implementation:
-
The current similarity threshold calibrated is 40 percent of the user’s search term and it is the most optimal for medium sized strings. It is based on the observation that a user is more likely to make mistakes when searching using a longer search term as compared to a shorter one. Long search terms are also rare.
-
-
Alternatives Considered:
-
Using a calibration percentage above 70 percent. This is not optimal for our use case as words with similar spelling but different meanings e.g 'moon' and 'noon', will be more often included in the search results.
-
4.2. Slideshow feature
The slideshow feature is dependent on the questions added by the question slideshow [QUESTIONS INDEX] command and
interacts with the ModelManager to retrieve the list of questions to be displayed in the slideshow.
The logic control for displaying the ui resides in the SlideshowWindow class and handles the controls and instantiation
of the various QuestionPanel that contains each question.
Below is the sequence diagram of the interactions that happen from when the slideshow command is entered, to the corresponding questions displayed in the slideshow.
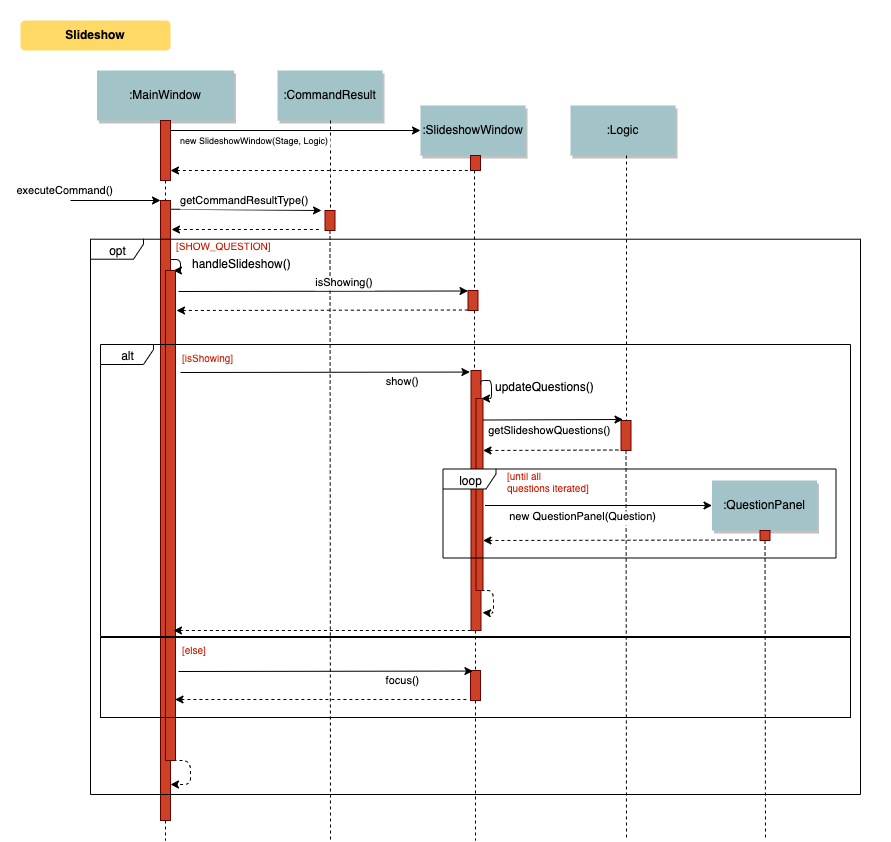
Implementation
The following is an example and detailed explanation as to how the questions are fetched and displayed on the slideshow.
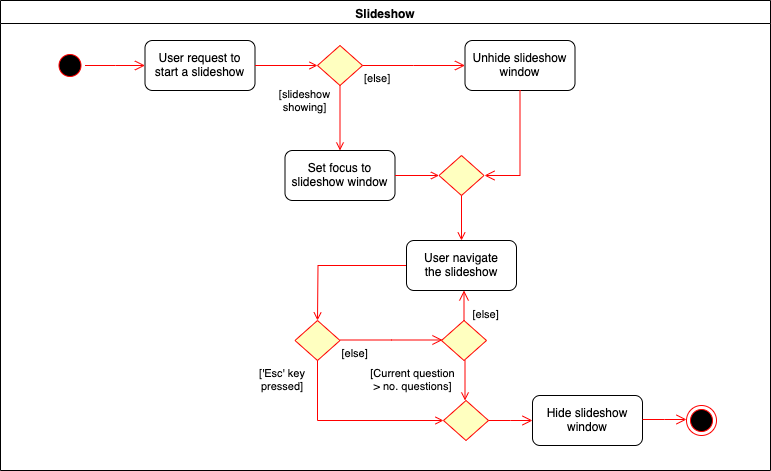
Step 1. The user requests to start a slideshow with a selection of questions using the question slideshow [QUESTIONS INDEX] command.
This will add questions based on the Index specified and will be added to the slideshowQuestions list under the SavedQuestions class.
The usage of Index here is such that it follows the same convention of when the user edits or deletes a question.
| The order of the questions displayed on the slideshow will be based on the input order. |
Step 2. The command is executed and the MainWindow calls CommandResult#isShowSlideshow() to verify if the command specified
is to start a slideshow. The SlideshowWindow is then displayed through the SlideshowWindow#slideShowWindow.show().
| The slideshow window has already been instantiated on application launch and the window is merely being hidden or shown. |
Step 3. The window is now visible and existing questions are cleared. The list of slideshow questions is then fetched through
Logic#getSlideshowQuestions() which in turn calls the ModelManager#getSlideshowQuestions() that fetches
the slideshowQuestions list in SavedQuestions.
Step 4. The user will then navigate and control the slideshow using the Left/Right, Space and Esc key as defined by the key
listeners in SlideshowWindow#initialiseKeyboardControls(Stage root). The currQuestionIndex will be incremented when
the user navigates to the next question and decremented when navigating to the previous question.
Step 5. The user exits the slideshow when the Esc key event is triggered or when the currQuestionIndex exceeds the questionPanels.size().
The behaviour of this follows the common procedure that most presentation programs adopt thus, it will not feel foreign to users.
4.2.2. Design Considerations
The following are the various design choices made regarding the feature and alternatives that were considered prior to implementation.
Controls
-
Current Implementation:
-
The choice of using the arrow keys for navigation and the
Escapekey to quit the slideshow is such that it will feel familiar to users who uses presentation programs often as they have similar controls. The only difference will be the usage of theSpacekey to show answers as it will be something new to the users and is unique to Njoy.
-
-
Alternatives Considered:
-
Usage of the
Akey to show answers. However, this is not very feasible as it is easily forgotten and not as user-friendly due to the smaller surface of the key as compared to theSpacekey.
-
Display
-
Current Implementation:
-
The ordering of the questions is defined based on the user input so it gives flexibility to the user to choose the ordering that they want the questions to be displayed.
-
Placement of the question numbering, topic, options and answer follows the common convention where the question numbering will be at the top followed by the topic, options and then the answer. This is such that viewers will not be confused by the layout.
-
Font sizes are displayed in the following descending order to allow the text for easy viewing:
-
Question Number
-
Question Topic & Options
-
Answer
-
-
-
Alternatives Considered:
-
Having a separate answer format for MCQ such that it will have an arrow beside the correct option e.g A) 1965 < (Answer). However, this is not feasible as it will break the standard formatting of the answers display since both
openandmcqquestions will have 2 different answer formats and may cause confusion to the user.
-
4.3. Quiz feature
Overview
The quiz feature utilises the questions implemented and stored in the QuestionBank#questions observable list. The quiz feature utilises the QuizCommandParser class to parse the user command input into the different command types and validates the input. Quizzes are then added into the QuizBank#quizzes observable list. The quiz feature also relies heavily on the QuizManager class for handling commands from QuizCommand#execute. This is done to hide the implementation logic from the ModelManager class.
The feature comprises of eight commands namely,
-
QuizCreateManuallyCommand- Creates a quiz with user input manually -
QuizCreateAutomaticallyCommand- Creates a quiz automatically -
QuizAddQuestionCommand- Adds an existing question to an existing quiz -
QuizDeleteQuestionCommand- Deletes an existing question from an existing quiz -
QuizExportCommand- Exports an existing quiz to a html file -
QuizListCommand- Listing questions and answers of an existing quiz -
QuizShowAnswersCommand- Showing answers of an existing quiz -
QuizShowQuestionsCommand- Showing questions of an existing quiz
The commands when executed, will interface with the methods exposed by the Model interface to perform the related operations
(See logic component for the general overview).
The quiz creation processes share similar paths and is further illustrated in the following sequence diagram:

quiz manual and quiz auto CommandsThe other processes share similar paths and is further illustrated in the following sequence diagram:

quiz add, quiz delete, quiz export, quiz list, quiz showAnswers and quiz showQuestions Commands4.3.1. Creating Quiz Manually
The create quiz manually feature allows the user to create a quiz in Njoy.
This feature is facilitated by CreateQuizManuallyCommand, QuizCommandParser, NjoyParser, SavedQuizzes, QuizBank and QuizManager.
The arguments supported by this feature includes:
-
Quiz ID -
Question Numbers(1…*)
Example of a possible command: quiz manual quizID/CS2103T questionNumber/1 2
This adds questions 1 and 2 to the quiz named CS2103T.
Implementation
When the user inputs the quiz manual command in the command line, the following chain of operations occur:
-
The
NjoyParserwill delegate the parsing of the command toQuizCommandParser. -
QuizCommandParser#parse()will take in aStringinput consisting of the arguments. -
The arguments will be tokenized and the respective models for each argument are created.
-
If the parsing of all arguments are successful, a new
QuizCreateManuallyCommandis returned back toLogicManager. -
The
LogicManagerexecutesQuizCreateManuallyCommand#execute(). This in turn executesmodel#createQuizManually(). -
The
ModelManagerdefers the operations toSavedQuizzes#createQuizManually(). -
Finally, this delegates the actual operations to
QuizManager#createQuizManually(). -
The newly created
Quizobject is added to theQuizBankinSavedQuizzesfor storage and further use.
4.3.2. Creating Quiz Automatically
The create quiz automatically feature allows the user to create a quiz in Njoy.
This feature is facilitated by CreateQuizAutomaticallyCommand, QuizCommandParser, NjoyParser, SavedQuizzes, QuizBank and QuizManager.
The arguments supported by this feature includes:
-
Quiz ID -
Number of Questions(1…*) -
Question Type(Mcq, Open ended, All)
Example of a possible command: quiz auto quizID/CS2103T numQuestions/2 type/mcq
This randomly adds 2 mcq questions to the quiz named CS2103T.
Implementation
When the user inputs the quiz auto command in the command line, the following chain of operations occur:
-
The
NjoyParserwill delegate the parsing of the command toQuizCommandParser. -
QuizCommandParser#parse()will take in aStringinput consisting of the arguments. -
The arguments will be tokenized and the respective models for each argument are created.
-
If the parsing of all arguments are successful, a new
QuizCreateAutomaticallyCommandis returned back toLogicManager. -
The
LogicManagerexecutesQuizCreateAutomaticallyCommand#execute(). This in turn executesmodel#createQuizAutomatically(). -
The
ModelManagerdefers the operations toSavedQuizzes#createQuizAutomatically(). -
Finally, this delegates the actual operations to
QuizManager#createQuizAutomatically(). -
The newly created
Quizobject is added to theQuizBankinSavedQuizzesfor storage and further use.
4.3.3. Adding a Question to a Quiz
The quiz add question feature allows the user to add a question to a quiz in Njoy.
This feature is facilitated by QuizAddQuestionCommand, QuizCommandParser, NjoyParser, SavedQuizzes, QuizBank and QuizManager.
The arguments supported by this feature includes:
-
Quiz ID -
Question Number -
Quiz Question Number
Example of a possible command: quiz add quizID/CS2103T questionNumber/2 quizQuestionNumber/3
This adds question 2 to the quiz named CS2103T as question 3.
Implementation
When the user inputs the quiz add command in the command line, the following chain of operations occur:
-
The
NjoyParserwill delegate the parsing of the command toQuizCommandParser. -
QuizCommandParser#parse()will take in aStringinput consisting of the arguments. -
The arguments will be tokenized and the respective models for each argument are created.
-
If the parsing of all arguments are successful, a new
QuizAddQuestionCommandis returned back toLogicManager. -
The
LogicManagerexecutesQuizAddQuestionCommand#execute(). This in turn executesmodel#addQuizQuestion(). -
The
ModelManagerdefers the operations toSavedQuizzes#addQuizQuestion(). -
Finally, this delegates the actual operations to
QuizManager#addQuizQuestion(). -
The
Questionobject is added to the chosenQuizobject in theQuizBankinSavedQuizzesfor storage and further use.
4.3.4. Deleting a Question from a Quiz
The quiz delete question feature allows the user to delete a question from a quiz in Njoy.
This feature is facilitated by QuizDeleteQuestionCommand, QuizCommandParser, NjoyParser, SavedQuizzes, QuizBank and QuizManager.
The arguments supported by this feature includes:
-
Quiz ID -
Quiz Question Number
Example of a possible command: quiz delete quizID/CS2103T quizQuestionNumber/3
This deletes question number 3 of the quiz named CS2103T.
Implementation
When the user inputs the quiz delete command in the command line, the following chain of operations occur:
-
The
NjoyParserwill delegate the parsing of the command toQuizCommandParser. -
QuizCommandParser#parse()will take in aStringinput consisting of the arguments. -
The arguments will be tokenized and the respective models for each argument are created.
-
If the parsing of all arguments are successful, a new
QuizDeleteQuestionCommandis returned back toLogicManager. -
The
LogicManagerexecutesQuizDeleteQuestionCommand#execute(). This in turn executesmodel#deleteQuizQuestion(). -
The
ModelManagerdefers the operations toSavedQuizzes#deleteQuizQuestion(). -
Finally, this delegates the actual operations to
QuizManager#deleteQuizQuestion(). -
The
Questionobject is deleted from the chosenQuizobject in theQuizBankinSavedQuizzesfor storage and further use.
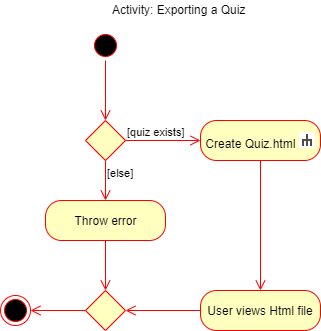
4.3.5. Exporting a Quiz to HTML
The quiz export feature allows the user to export a quiz to HTML in Njoy.
This feature is facilitated by QuizExportCommand, QuizCommandParser, NjoyParser, SavedQuizzes, QuizBank and QuizManager.
The arguments supported by this feature includes:
-
Quiz ID
Example of a possible command: quiz export quizID/CS2103T
This exports the quiz named CS2103T to a HTML file in the user’s directory.
Implementation
When the user inputs the quiz export command in the command line, the following chain of operations occur:
-
The
NjoyParserwill delegate the parsing of the command toQuizCommandParser. -
QuizCommandParser#parse()will take in aStringinput consisting of the arguments. -
The arguments will be tokenized and the respective models for each argument are created.
-
If the parsing of all arguments are successful, a new
QuizExportCommandis returned back toLogicManager. -
The
LogicManagerexecutesQuizExportCommand#execute(). This in turn executesmodel#exportQuiz(). -
The
ModelManagerdefers the operations toSavedQuizzes#exportQuiz(). -
Finally, this delegates the actual operations to
QuizManager#exportQuiz(). -
The
Quizobject is exported to a HTML file in the user’s directory for further use.
quiz export command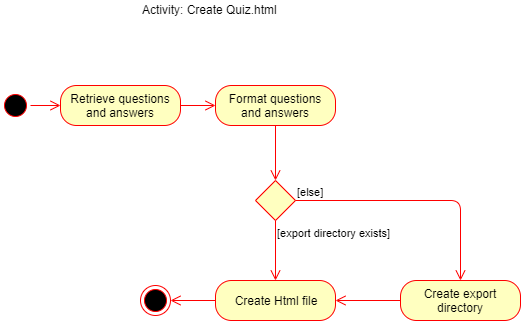
quiz export command4.3.6. Listing Questions and Answers of a Quiz
The quiz list feature allows the user to list both questions and answers from a quiz in Njoy.
This feature is facilitated by QuizListCommand, QuizCommandParser, NjoyParser, SavedQuizzes, QuizBank and QuizManager.
The arguments supported by this feature includes:
-
Quiz ID
Example of a possible command: quiz list quizID/CS2103T
This lists the questions and answers of the quiz named CS2103T.
Implementation
When the user inputs the quiz list command in the command line, the following chain of operations occur:
-
The
NjoyParserwill delegate the parsing of the command toQuizCommandParser. -
QuizCommandParser#parse()will take in aStringinput consisting of the arguments. -
The arguments will be tokenized and the respective models for each argument are created.
-
If the parsing of all arguments are successful, a new
QuizListCommandis returned back toLogicManager. -
The
LogicManagerexecutesQuizListCommand#execute(). This in turn executesmodel#getObservableListQuestionsFromQuiz(). -
The
ModelManagerdefers the operations toSavedQuizzes#getObservableListQuestionsFromQuiz(). -
Finally, this delegates the actual operations to
QuizManager#getObservableListQuestionsFromQuiz(). -
The questions and answers for the quiz are displayed onto the UI.
4.3.7. Showing Answers of a Quiz
The quiz show answers feature allows the user to show only answers from a quiz in Njoy.
This feature is facilitated by QuizShowAnswersCommand, QuizCommandParser, NjoyParser, SavedQuizzes, QuizBank and QuizManager.
The arguments supported by this feature includes:
-
Quiz ID
Example of a possible command: quiz showAnswers quizID/CS2103T
This shows the answers of the quiz named CS2103T.
Implementation
When the user inputs the quiz showAnswers command in the command line, the following chain of operations occur:
-
The
NjoyParserwill delegate the parsing of the command toQuizCommandParser. -
QuizCommandParser#parse()will take in aStringinput consisting of the arguments. -
The arguments will be tokenized and the respective models for each argument are created.
-
If the parsing of all arguments are successful, a new
QuizShowAnswersCommandis returned back toLogicManager. -
The
LogicManagerexecutesQuizShowAnswersCommand#execute(). This in turn executesmodel#getObservableListQuestionsFromQuiz(). -
The
ModelManagerdefers the operations toSavedQuizzes#getObservableListQuestionsFromQuiz(). -
Finally, this delegates the actual operations to
QuizManager#getObservableListQuestionsFromQuiz(). -
The answers for the quiz are displayed onto the UI.
4.3.8. Showing Questions of a Quiz
The quiz show questions feature allows the user to show only questions from a quiz in Njoy.
This feature is facilitated by QuizShowQuestionsCommand, QuizCommandParser, NjoyParser, SavedQuizzes, QuizBank and QuizManager.
The arguments supported by this feature includes:
-
Quiz ID
Example of a possible command: quiz showQuestions quizID/CS2103T
This shows the answers of the quiz named CS2103T.
Implementation
When the user inputs the quiz showQuestions command in the command line, the following chain of operations occur:
-
The
NjoyParserwill delegate the parsing of the command toQuizCommandParser. -
QuizCommandParser#parse()will take in aStringinput consisting of the arguments. -
The arguments will be tokenized and the respective models for each argument are created.
-
If the parsing of all arguments are successful, a new
QuizShowQuestionsCommandis returned back toLogicManager. -
The
LogicManagerexecutesQuizShowQuestionsCommand#execute(). This in turn executesmodel#getObservableListQuestionsFromQuiz(). -
The
ModelManagerdefers the operations toSavedQuizzes#getObservableListQuestionsFromQuiz(). -
Finally, this delegates the actual operations to
QuizManager#getObservableListQuestionsFromQuiz(). -
The answers for the quiz are displayed onto the UI.
4.4. Student feature
The student feature utilises the StudentCommandParser class to parse the user command input into the different
command types and validates the input. Students are then added into the UniqueStudentList#students observable list.
The feature comprises of five commands namely,
-
StudentAddCommand- Adding students to overall student list -
StudentEditCommand- Editing students -
StudentDeleteCommand- Deleting students -
StudentListCommand- Listing students
The Student Commands share similar paths, and is further illustrated in the following sequence diagram, which shows the sequence diagram for the StudentAddCommand.
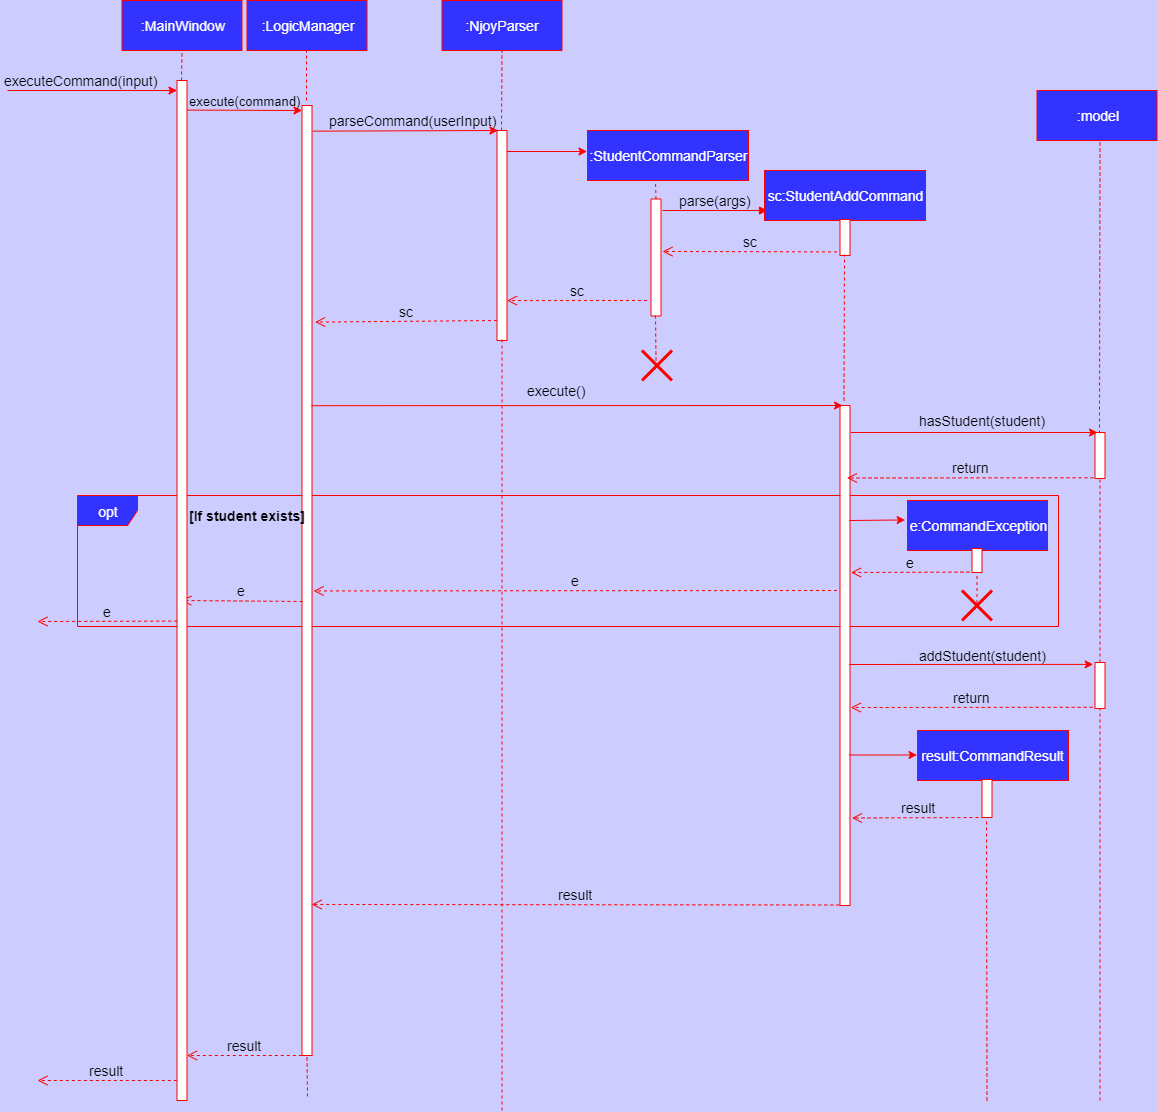
StudentAddCommand
The following are the common steps among all Student commands.
-
The
NjoyParserwill delegate the parsing of the command toStudentCommandParser -
StudentCommandParser#parsewill take in aStringinput consisting of the arguments. -
The arguments will be tokenized and the respective models for each argument are created.
4.4.1. Add command
Implementation
The following is a detailed explanation of the operations StudentAddCommand performs.
-
If the parsing is successful,
StudentAddCommand#execute(Model model)method is executed and it validates the student defined. Since student names are unique, if a duplicate student is input, and exception is thrown and the duplicate student is not added. -
If tags are present in the input,
Tagsare created and added to theStudentin theStudentCommandParser#addCommand(ArgumentMultimap argMultimap)method. -
The method
Model#addStudent(Student student)will then be called to add the created student and a success message will be generated by theStudentAddCommand#generateSuccessMessage(Student student)method and a newCommandResultwill be returned with the generated success message. -
The newly created student is added to the
StudentRecord.
4.4.2. Edit command
Implementation
The following is a detailed explanation of the operations StudentEditCommand performs.
-
If the parsing is successful,
StudentEditCommand#execute(Model model)method is executed and it checks if theIndexdefined when instantiatingStudentEditCommand(Index index, EditStudentDescriptor editStudentDescriptor)is valid. It uses theStudentEditCommand.EditStudentDescriptorto create the new student. -
A new
Studentwith the updated values will be created and replace the existing student object through theModel#setStudent(studentToEdit, editedStudent)method. -
The filtered student list will be updated with the new student with the
model#updateFilteredStudentList(PREDICATE_SHOW_ALL_STUDENTS)method. -
A success message will be generated by the
StudentEditCommand#generateSuccessMessage(Student studentToEdit, Student editedStudent)method and a newCommandResultwill be returned with the generated success message.
4.4.3. Delete command
Implementation
The following is a detailed explanation of the operations StudentDeleteCommand performs.
-
If the parsing is successful,
StudentDeleteCommand#execute(Model model)method is executed and it checks if theIndexdefined when instantiatingStudentDeleteCommand(Index index)is valid (IE: Not out of bounds of student list) -
The
Studentat the specifiedIndexis then removed from theUniqueStudentList#studentsobservable list through theModel#deleteStudent(Index index)method. -
A success message will be generated by the
StudentDeleteCommand#generateSuccessMessage(Student student)method and a newCommandResultwill be returned with the generated success message.
4.4.4. List command
The following is a detailed explanation of the operations StudentListCommand performs.
Implementation
-
If the parsing is successful,
StudentListCommand#execute(Model model)method is executed. No validation is necessary here since it does not write to the student list. -
The
Model#getStudentSummary()method is then called and the questions are returned as aStringto the newCommandResultobject. -
If any view other than the view of the student list is showing on the
MainWindow, the 'MainWindow#handleStudent() method is called and the student list is now visible on the Main Window.In this implementation of the application, the list of students is rendered on the GUI of the main window. Hence, the command merely prints its contents on the Command Result box.
Command Syntax
-
Current Implementation:
-
Current implementation of the commands follows the command word syntax e.g student followed by the arguments necessary to execute the add, edit, delete and list commands.
-
-
Alternatives Considered:
-
Usage of a forward slash
/and then the command word. Although it makes it clearer that the input is a command, we realised it is redundant as the only input will be commands and will make it more tedious for the user.
-
Aspect: Command Length
-
Current Implementation:
-
Commands are currently shortened as much as possible through the use of initials without much loss in clarity. For example, when denoting the index number of the student to delete in
StudentDeleteCommand, we use index/ instead of studentIndexNumber/.
-
-
Alternatives Considered:
-
Using more descriptive terms as arguments such that each argument will be specified clearly. However, this decreases the user experience as the command will be too long.
-
4.5. Tag feature
The tag command was included in nJoyAssistant to help teachers identify the weak subjects of
their students easily.
The tag feature utilises the TagCommandParser class to parse and validate the
user input. Tags are then added into the Student that was specified by the Index
in the input.
The feature comprises of one command namely,
-
TagCommand- Tagging student specified by index number
The command when executed, will interface with the methods exposed by the Model interface to perform the related operations
(See logic component for the general overview).
To Add: Class diagram of the interaction between the tag parser and command
4.5.1. Tag command
Implementation
The following is a detailed explanation of the operations TagCommand performs.
-
The
NjoyParserwill delegate the parsing of the command toTagCommandParser -
TagCommandParser#parsewill take in aStringinput consisting of the arguments. -
The arguments will be tokenized and the respective models for each argument are created.
-
The
TagCommand#execute(Model model)method is executed and it validates the tag(s) defined. Since tags attached to a 'Student' are unique, if duplicate tags are added to a 'Student', an error message is shown. -
The method
TagCommand#createTaggedStudent(Student studentToTag,Set<Tag> tagSet)will then be called to create a new student with the updated tags, and the methodmodel#setStudentWithIndex(Index actualIndex, Student updatedStudent)will update the existing student with the new student(with the tags) -
A success message will be generated by the
TagCommand#generateSuccessMessage(String taggedStudentNotification, String existedTagsNotification)method and a newCommandResultwill be returned with the generated success message.
| If more than one tag is to be added, do tag/TAG_ONE tag/TAG_TWO. Full example: "tag index/1 tag/Chemistry tag/Physics" |
Aspect: Command Syntax
-
Current Implementation:
-
Current implementation of the commands follows the command word syntax e.g tag followed by the arguments necessary to execute the tag command.
-
-
Alternatives Considered:
-
Usage of a forward slash
/and then the command word. Although it makes it clearer that the input is a command, we realised it is redundant as the only input will be commands and will make it more tedious for the user.
-
Aspect: Command Clarity
-
Current Implementation:
-
"tag index/1 tag/Chemistry tag/Physics"
-
We currently have a tag/ before each tag that is to be added to the student at the specified index number. Although this might be slightly lengthier, it is clearer that we are adding two separate tags as opposed to one tag with a space in between.
-
-
Alternatives Considered:
-
"tag index/1 tag/Chemistry Physics"
-
Using just one tag/ before inserting all the tags to be added to the particular student may result in a misconception that a tag with multiple words can be added.
-
4.6. Mark feature
The mark feature is included in nJoyAssistant to help teachers identify the students who are in dire need of
academic help due to poor overall results.
The tag feature utilises the MarkCommandParser class to parse and validate the
user input.
The feature comprises of two commands namely,
-
AddMarkCommand- Marking student specified by index number -
RemoveMarkCommand- Unmarking student specified by index number
The command when executed, will interface with the methods exposed by the Model interface to perform the related operations
(See logic component for the general overview).
The logic flow for both the mark and unmark commands are quite similar, and can be seen by the following activity
diagram that depicts the execution of the AddMarkCommand.

AddMarkCommand
The following are the common steps among all Mark commands.
-
The
NjoyParserwill delegate the parsing of the command toMarkCommandParser -
MarkCommandParser#parsewill take in aStringinput consisting of the arguments. -
The arguments will be tokenized and the respective models for each argument are created.
4.6.1. Add Mark command
Implementation
The following is a detailed explanation of the operations AddMarkCommand performs.
-
The
AddMarkCommand#execute(Model model)method is executed and it validates theIndexderived from the input. -
The method
Student#setMarked()will then be called to mark theStudentwith the specifiedIndex -
A success message will be generated by the
AddMarkCommand#generateSuccessMessage(String MESSAGE_SUCCESS, int index)method and a newCommandResultwill be returned with the generated success message.
| Index cannot be out of bounds of the student list, and cannot attempt to mark a student that has already been marked. |
4.6.2. Remove Mark command
Implementation
The following is a detailed explanation of the operations RemoveMarkCommand performs.
-
The
RemoveMarkCommand#execute(Model model)method is executed and it validates theIndexderived from the input. image::Ui.png[] -
The method
Student#setUnmarked()will then be called to mark theStudentwith the specifiedIndex -
A success message will be generated by the
RemoveMarkCommand#generateSuccessMessage(String MESSAGE_SUCCESS, int index)method and a newCommandResultwill be returned with the generated success message.
| Index cannot be out of bounds of the student list, and cannot attempt to unmark a student that has not already been marked. |
4.6.3. Design Considerations
Aspect: Command Syntax
-
Current Implementation:
-
Current implementation of the commands follows the command word syntax e.g tag followed by the arguments necessary to execute the tag command.
-
-
Alternatives Considered:
-
Usage of a forward slash
/and then the command word. Although it makes it clearer that the input is a command, we realised it is redundant as the only input will be commands and will make it more tedious for the user.
-
Aspect: Command Complexity
-
Current Implementation:
-
Current implementation of the commands only allows users to mark/unmark one student at a time, so as to reduce the complexity of the command.
-
-
Alternatives Considered:
-
Allow users to mark multiple students at the same time, but this would result in a more complex command, making it more prone to mistakes.
-
4.7. Group feature
The group feature utilises the students stored in the UniqueStudentList#students observable list.
The group feature utilises the GroupCommandParser class to parse the user command input into the different command types and validates the input.
The feature comprises of four commands namely,
-
GroupCreateManuallyCommand- Creates a group with user input manually -
GroupAddStudentCommand- Adds a student to an existing group -
GroupRemoveStudentCommand- Removes a student from an existing group -
GroupGetStudentsCommand- Listing students of an existing group -
GroupExportCommand- Exports group with student information to a word document
The commands when executed, will interface with the methods exposed by the Model interface to perform the related operations
(See logic component for the general overview).
The following are the common steps among all Group commands.
-
The
NjoyParserwill delegate the parsing of the command toGroupCommandParser -
GroupCommandParser#parsewill take in aStringinput consisting of the arguments. -
The arguments will be tokenized and the respective models for each argument are created.
4.7.1. Create Manually command
Implementation
The following is a detailed explanation of the operations GroupCreateManuallyCommand performs.
-
If the parsing of arguments is successful,
GroupCreateManuallyCommand#execute(Model model)method is executed and it validates the groupId, making sure that there is no existing group with the same groupId. Then, it validates the student numbers, making sure that all student numbers currently exist within theUniqueStudentList#studentsobservable list. -
The method
Model#createGroupManually(String groupId, ArrayList<Integer> studentNumbers)will then be called to create the group with the specified students. -
Then, a success message will be generated by the
GroupCreateManuallyCommand#generateSuccessMessage()method and a newCommandResultwill be returned with the generated success message.
4.7.2. Add Student command
Implementation
The following is a detailed explanation of the operations GroupAddStudentCommand performs.
-
If the parsing of arguments is successful,
GroupAddStudentCommand#execute(Model model)method is executed and it validates the student number, making sure that the student number currently exists within theUniqueStudentList#studentsobservable list. -
The method
Model#addStudentToGroup(String groupId, int studentNumber, int groupIndexNumber)will then be called to add the specified student to the specified group, with the specified group index number. -
Then, a success message will be generated by the
GroupAddStudentCommand#generateSuccessMessage()method and a newCommandResultwill be returned with the generated success message.
4.7.3. Remove Student command
Implementation
The following is a detailed explanation of the operations GroupRemoveStudentCommand performs.
-
If the parsing of arguments is successful,
GroupRemoveStudentCommand#execute(Model model)method is executed. -
The method
Model#removeStudentFromGroup(String groupId, int studentNumber)will then be called to remove a specified student from the specified group. -
Then, a success message will be generated by the
GroupRemoveStudentCommand#generateSuccessMessage()method and a newCommandResultwill be returned with the generated success message.
4.7.4. List(Show) command
Implementation
The following is a detailed explanation of the operations GroupGetStudentsCommand performs.
-
If the parsing of arguments is successful,
GroupGetStudentsCommand#execute(Model model)method is executed. -
The method
ListOfGroups#setCurrentlyQueriedGroup(String groupId)will then be called to set the currently queried group to match the one that the user input, andCommandResultTypeis set toSHOW_GROUP -
The method
MainWindow#handleGroup()is then called, opening a new window to show the queried group and the relevant students. -
Then, a success message will be generated by the
GroupGetStudentsCommand#generateSuccessMessage()method and a newCommandResultwill be returned with the generated success message.
| In this implementation of the application, the groups and respective students are rendered on the GUI of the new window. Hence, the command merely prints its contents on the Command Result box. |
4.7.5. Export command
Implementation
The following is a detailed explanation of the operations GroupExportCommand performs.
-
If the parsing of arguments is successful, the
GroupExportCommand#execute(Model model)method is executed. -
The method
model#exportGroup(String groupId)will then be called -
The method
groupList#exportGroup(String groupIdis then called, which gets the group with the specified groupId. -
The method
queriedGroup#export()is then called, which writes the information of the students in the queried group into a word document with the name[GROUP_ID].docx, and it is stored in the export folder. -
Then, a success message will be generated by the
GroupExportCommand#generateSuccessMessage()method and a newCommandResultwill be returned with the generated success message.
| If the queried group has groupId 'G03', the name of the generated word document would be G03.docx |
4.7.6. Design Considerations
Aspect: Command Syntax
-
Current Implementation:
-
Current implementation of the commands follows the command word syntax e.g group followed by the minimum arguments necessary to execute the tag command.
-
-
Alternatives Considered:
-
Usage of a forward slash
/and then the command word. Although it makes it clearer that the input is a command, we realised it is redundant as the only input will be commands and will make it more tedious for the user.
-
Aspect: Command Length
-
Current Implementation:
-
Commands are currently shortened as much as possible without much loss in clarity. For example, instead of using showStudentsInGroup/ , we just ask users to provide groupId/[GROUP_ID] to show a list of students in that group. Although this may be unfamiliar to the user initially, it should be easy to pick up and will make it less tedious during input.
-
-
Alternatives Considered:
-
Using more descriptive terms as arguments such that each argument will be specified clearly. However, this decreases the user experience as the command will be too long.
-
Aspect: Command Complexity
-
Current Implementation:
-
Only allow users add one student to a group at a time after the group has been initialized. This is to make the commands as short and simple as possible to lessen the chance of a mistake.
-
-
Alternatives Considered:
-
Allow users to add multiple students to already initialized groups at the same time, but results in a longer and more complex command.
-
4.8. Notes feature
The notes feature acts as a lightweight,digital “Post-It” for teachers.
The feature comprises of four commands namely,
-
NoteAddCommand- Creates a note with a description. -
NoteEditCommand- Edits an existing note. -
NoteDeleteCommand- Deletes an existing note. -
NoteListCommand-Lists all notes. -
NoteSortCommand-Sorts all notes.
The commands when executed, will interface with the methods exposed by the Model interface to perform the related operations
(See logic component for the general overview).
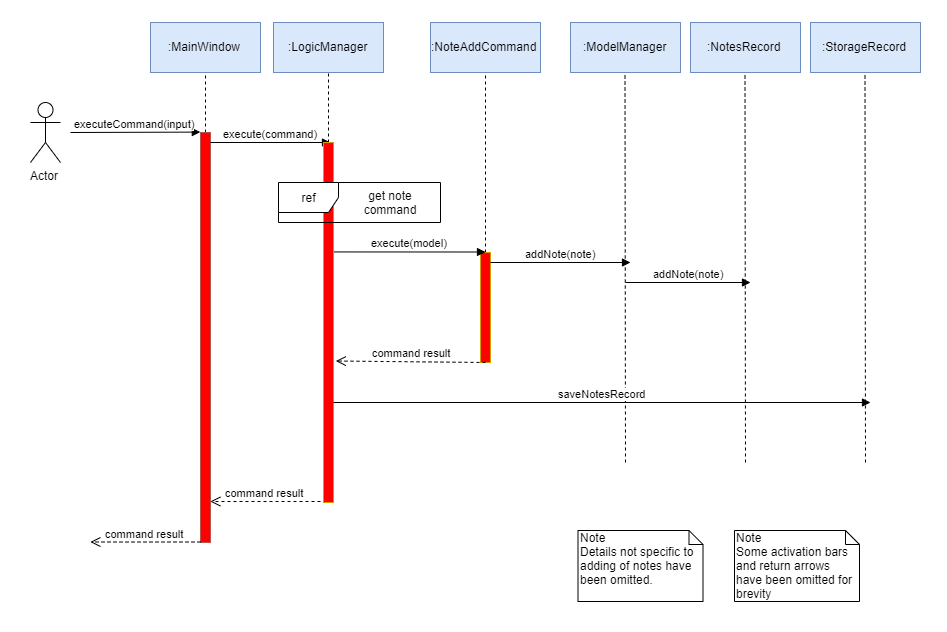
4.8.1. Add Note Command
Implementation
The following is a detailed explanation of the operations NoteAddCommand performs.
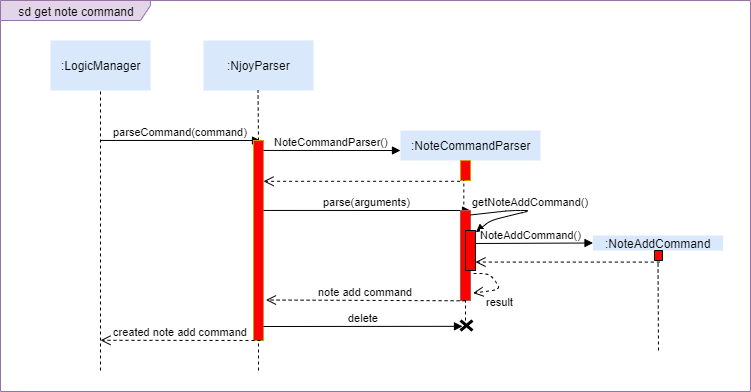
-
The
NoteAddCommand#execute(Model model)method is executed and it validates that theNoteobject passed from the parser using command input is valid. -
The method
Model#addNote(Note note)will then be called to add the specified note to theNotesRecord. TheNoteadded is validated for uniqueness byNote#isSameNote(Note note). -
If successful, a success message will be generated and a new
CommandResultwill be returned with the generated success message. Otherwise, an error message showing proper note command syntax is thrown asCommandException. -
If the command syntax was valid and
Notewas added to theNotesRecord,LogicManagercallsStorage#saveNotesRecord(ReadOnlyNotesRecord notesRecord)which saves theNotesRecordin JSON format after serializing it using theJsonSerializableNotesRecord.
The ReadOnlyNotesRecord hides the implementation of the NotesRecord from the other layers of the software.
|
The following is a sample sequence diagram of the NoteAddCommand. Other commands under the notes feature follow a similar program flow; their diagrams have been omitted for brevity.
4.8.2. Edit Note Command
Implementation
The following is a detailed explanation of the operations NoteEditCommand performs.
-
The
NoteEditCommand#execute(Model model)method is executed and it validates that theNoteindex is within range. It uses theNoteEditCommand.EditNoteDescriptorto create the new note. -
The method
Model#setNote(Note noteToEdit, Note editedNote)will then be called to edit the note from theNotesRecord. The methodNotesRecord#setNote(Note target, Note editedNote)validates that the edited note maintains the unique property of each note in its internal list using the comparisonNote#isSameNote(Note note). If it is unique, the target note is edited to the new one. -
If successful, a success message will be generated and a new
CommandResultwill be returned with the generated success message. Otherwise, an error message showing proper note command syntax is thrown asCommandException. -
If the command syntax was valid and
Notewas edited from theNotesRecord,LogicManagercallsStorage#saveNotesRecord(ReadOnlyNotesRecord notesRecord)which saves the edited notes in JSON format after serializing it using theJsonSerializableNotesRecord.
4.8.3. Delete note command
Implementation
The following is a detailed explanation of the operations NoteDeleteCommand performs.
-
The
NoteDeleteCommand#execute(Model model)method is executed and it validates that the specifiedNoteindex to delete is within range. If valid, the note is retrieved using its index in theModel’s filtered notes list. -
The method
Model#deleteNote(Note noteToDelete)will then be called to remove the note from theNotesRecord.NotesRecord#removeNote(Note note)is invoked which makes a call to its internal list to remove the speficied note. -
If successful, a success message will be generated and a new
CommandResultwill be returned with the generated success message. Otherwise, an error message showing proper note command syntax is thrown asCommandException.
Unlike the previous Note comparisons, removal of notes from the internal list uses Note#equals(Object other) comparison instead of the Note#isSameNote(Note otherNote).
|
4.8.4. Note list command
| In this implementation of the application, the teacher’s notes are rendered on the GUI on loading the application. Hence, the list notes command merely prints its contents on the Command Result box. |
Implementation
The following is a detailed explanation of the operations NoteListCommand performs.
-
The
NoteListCommand#execute(Model model)method is executed. It updates the notes list inModel. It retrieves theNotesRecordobject of typeReadOnlyNotesRecordin theModelManagerto enumerate the list. -
The method
NoteListCommand#generateSuccessMessage(ReadOnlyNotesRecord notesRecord)generates a String representation of the notes in the command. -
If successful, the success message generated is returned with the
CommandResult. Otherwise, an error message showing proper note command syntax is thrown asCommandException. -
Success or error message for the list notes command is rendered in the command result box.
4.8.5. Note sort command
Sorting is based on Note Priority attribute. Priority has value in descending order HIGH, MEDIUM, LOW and UNMARKED.
|
Implementation
The following is a detailed explanation of the operations NoteSortCommand performs.
-
The
NoteSortCommand#execute(Model model)method is executed. It sorts the notes list inModelby executingModel#sortNotesRecord(Comparator<Note> noteComparator). -
The sorting is passed to the
NotesRecordwhich uses the comparator implemented byNoteto sort and update its internal list. -
The
NoteSortCommand#execute(Model model)returns a success message for the sorting task. -
The filtered list in
NotesRecordhas been updated and the User Interface shows the newly sorted notes list.
4.8.6. Design Considerations
Aspect: Command Length
-
Alternative 1 (current choice): Short, intuitive and minimal compulsory fields.
-
Pros: More flexible for the user, easier to use and very lightweight.
-
Cons: Not as powerful and less utility for advanced users.
-
-
Alternative 2: Many fields including tagging, redo, undo et cetera.
-
Pros: Powerful, many features that advanced users can use.
-
Cons: Against original target of making the Notes feature super lightweight and easy to use. Should be as easy as a digital Post-it!
-
| Additional fields to the Note have been made optional such that it is very easy to use for beginner users and at the same time powerful for advanced ones. We aim to keep our notes feature as simple as a pen-paper recording or even simpler. |
4.9. Statistics feature
4.9.1. Generating Statistics
The statistics feature allows users of Njoy to generate statistics reports using external files as input data.
Current File Compatibilities: Excel(.xlsx)
A generic data parser of external files is used to generate HashMap of student’s data as specified by the input file. This processed data is passed to a Statistics Model which performs statistical analysis before passing back to the UI for rendering.
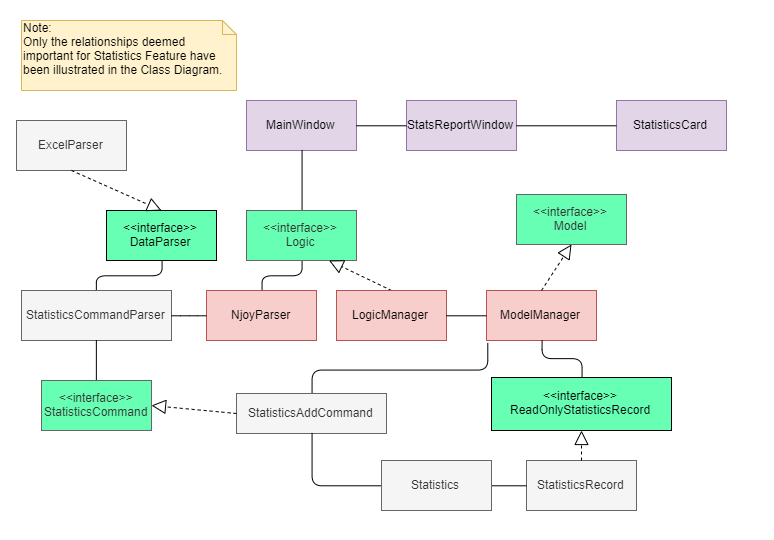
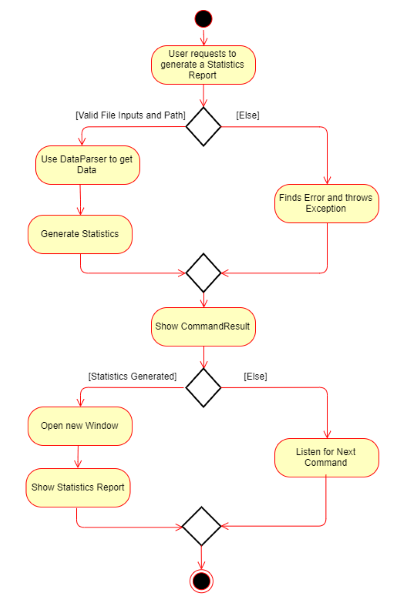
The following is an example usage scenario where the Actor/User asks Njoy for a statistics report.
-
Actor/User inputs a statistics command with data path as specified in user guide.
MainWindow#executeCommand(String commandText)passes the user input to theLogicManager. -
The logic manager passes received input into its main parser which recognises this is a command for statistics. It passes the input to the
StatisticsCommandParserfor retrieving data from the external file. All data file parsers implements theDataParserinterface. -
Suppose the data was successfully retrieved,
Statisticsobject is generated for data processing and passed intoStatisticsAddCommand. -
Execution of this command results in the processed data being passed to the
ModelManagerusingStatisticsAddCommand#execute. -
The success result of the Statistics command is shown on the GUI and the execution call has returned to
MainWindow#executeCommand(String commandText). It recognises the command was a valid Statistics command and opens a new window to show the processed data.
If the input file is not formatted as specified in the user guide, a ParseException would be thrown to show error message as the result. No new window is opened. The diagram below illustrates possible program control flows.
|
4.9.2. Design Considerations
Aspect: Rendering UI
-
Alternative 1 (current choice): Opens a new window for the report generated.
-
Pros: More space to work with, able to generate more comprehensive report that is easier to view.
-
Cons: Data widgets are no longer stateful, they are newly created every time a new report is requested.
-
-
Alternative 2: Render data for current state of the model on the user interface.
-
Pros: Stateful, no need to recreate the widget every time there is new input data.
-
Cons: Lack of space, hard to render other UI elements such as the timetable.
-
Aspect: Storing of generated data reports.
-
Alternative 1 (current choice): Generate a png report every time user requests for the report.
-
Pros: Available for printing, portable.
-
Cons: Can be difficult to implement, need good understanding of API.
-
-
Alternative 2: Save to database every time a report is generated and showing them when requested by unique identifiers.
-
Pros: Easy to use, no need to input long file path every time.
-
Cons: User most likely have data stored in respective educational database system. Report generation is not computationally intensive and thus offers little performance advantage for effort.
-
4.10. Events feature
Overview
The events feature allows users of Njoy to manage, view and export their events. This feature is built based on the Jfxtras iCalendarAgenda library. The iCalendarAgenda object is used on the UI side to render VEvents. The VEvent object from the iCalendarAgenda library is used to encapsulate event details such as event name, start date time, recurrence, etc. Note that VEvent is primarily used throughout the application, as it is the required object type for iCalendarAgenda. At the model level, VEvents are mapped to Event objects for saving and vice versa for reading purposes in the storage layer.
The feature comprises of the following features:
-
EventAddCommand- Creates a new event. -
EventIndexCommand- Gets the index of an event. -
EventEditCommand- Edits an existing event, identified by their index. -
EventDeleteCommand- Deletes an existing event, identified by their index. -
EventViewCommand- View and set the preferences of the event schedule. -
EventScreenshotCommand- Takes a screenshot of the current event schedule. -
EventExportCommand- Exports events to a .ics file type.
The commands when executed, will interface with the methods exposed by the Model interface to perform the related operations
(See logic component for the general overview).
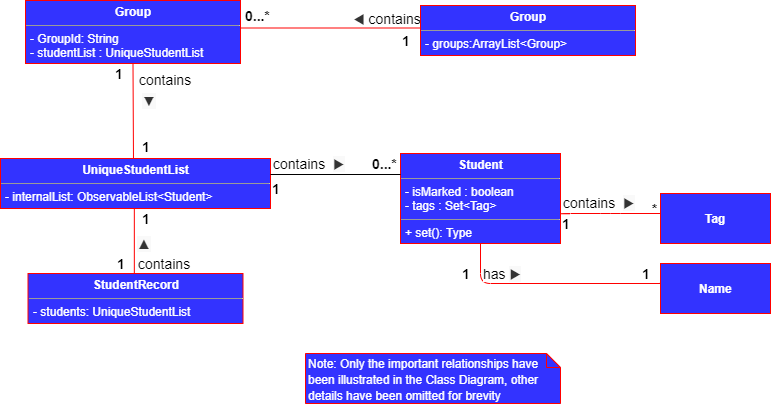
4.10.1. Class Overview
The figure below describes the interactions between event-related classes in the Model. Note how the EventRecord
class has a dependency on Event object in its constructor, but only has a VEvent attribute: vEvents. This
highlights a mapping between the Event and VEvent object within the EventRecord class. Althought the methods
of the EventRecord class are omitted for brevity, they are mostly VEvent based, which again highlights that
interactions with the Logic and UI components will mostly be done in VEvent type.

4.10.2. Add Event Command
Implementation
The following is a detailed explanation of the operations EventAddCommand performs.
-
The
EventAddCommand#execute(Model model)method is executed and it validates that theVEventobject passed from the parser using command input is valid. -
The method
Model#addVEvent(VEvent vEvent)will then be called to add the specified VEvent to theEventRecord. TheVEventadded is validated for uniqueness byEventUtil#isSameVEvent(VEvent vEvent). -
If successful, a success message will be generated and a new
CommandResultwill be returned with the generated success message. Otherwise, an error message showing the proper event add command syntax will be thrown asCommandException. -
If the command syntax was valid and
VEventwas added to theEventRecord,LogicManagercallsStorage#saveEvents(ReadOnlyEvents eventRecord)which saves theEventRecordin JSON format after serializing it using theJsonEventStorage.
The ReadOnlyVEventRecord and ReadOnlyEventRecord interfaces hides the implementation of the EventRecord from the other layers of the software.
|
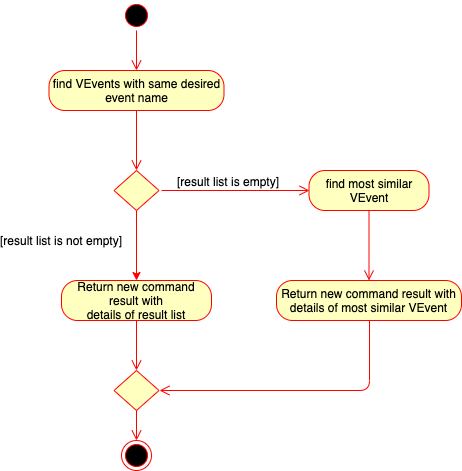
4.10.3. Index command
The following is a detailed explanation of the operations EventIndexCommand performs.
The purpose of this command is to return the index of the vEvent(s) with event name that equals to the desiredEventName which is input from the user.
And if there are no matching VEvents with the same event name. Suggest a VEvent with the most similar event name to that of
the desiredEventName based on the Levenshtein distance formula
The following is a sample activity diagram of the execute method of EventIndexCommand. Note that the "details"
in the diagram refers to the VEvent object itself and its corresponding index.
Implementation
-
The
EventIndexCommand#execute(Model model)method is executed. -
The method
EventRecord#findVEvents(String desiredEventName)is then called through theModel#findVEvents(String desiredEventName)method. -
The
EventRecord#vEventslist is iterated once and the search is performed on the 'desiredEventName' usingStringUtil#equalsIgnoreCasewith thesummaryvalue of eachVEvent. MatchingVEvent’s and their corresponding index in `vEventswill form a newPair<Index, VEvent>and be added to theresultIndexList. At the end of the iterationresultIndexListis returned. -
If the
resultIndexListreturned is not empty, a newCommandResultwill be returned with a message stating the Index and the corresponding details of the VEvents found. -
Else, when the
resultIndexListis empty, the methodEventRecord#findMostSimilarVEvent(String desiredEventName)is then called through theModel#findMostSimilarVEvent(String desiredEventName)method. -
If the there are no
VEvent, invEventsofEventRecordthe method will throw aVEventNotFoundExceptionwhich will be caught. This exception will then be wrapped to aCommandExceptionand thrown upwards with a corresponding user message to be shown. -
Otherwise,
EventRecord#vEventswill be iterated once, and the similarity betweendesiredEventNameand thesummaryvalue of each VEvent will be calculated based on the Levenshtein distance formula. At the end the event which is most similar and its index will create be returned as a newPair<Index, VEvent>. -
A new
CommandResultwill be returned with a message stating the Index and the corresponding details of the most similar VEvent found.
VEvent objects use a summary object to represent the name of an event.
|
4.10.4. Edit Event Command
Implementation
The following is a detailed explanation of the operations EventEditCommand performs.
-
The
EventEditCommand#execute(Model model)method is executed and it validates that the index is within range and there have been fields changed. It uses theEventEditCommand.EditVEventDescriptorto detect if any fields has been changed. -
The target VEvent to be edited is retrieved using the
Model#getVEvent(Index index)method. A neweditedVEventobject is then created using theEventEditCommand.EditVEventDescriptor -
Validation is then carried out to check that the setting of this new
editedVEventwill not result in duplicate VEvents in thevEventslist inEventRecordusing theEventUtil#isSameVEvent(VEvent vEvent)method and theModel#HasVEvent(VEvent vEvent)method. If validation fails, aCommandExceptionwill be thrown. -
If the validation is successful,
Model#setVEvent(Index index, VEvent vEvent)method will be called. This will replace the target VEvent with the neweditedVEvent. A success message will be generated by the and a newCommandResultwill be returned with the generated success message. -
If the command syntax was valid and
VEventwas edited from theEventRecord,LogicManagercallsStorage#saveEventRecord(ReadOnlyEventRecord eventRecord)which saves the edited notes in JSON format after serializing it using theJsonEventRecord.
4.10.5. Delete event command
Implementation
The following is a detailed explanation of the operations EventDeleteCommand performs.
-
The
EventDeleteCommand#execute(Model model)method is executed and it validates that the specifiedIndexto delete is within range. If valid, the vEvent to be deleted will be retrieved using itsIndex. -
The method
Model#deleteVEvent(Index index)will then be called to remove theVEventfrom theEventRecord.EventRecord#deleteVEvent(Index index)is invoked which makes a call to its internal list to remove the speficied vEvent. -
If successful, a success message will be generated by the and a new
CommandResultwill be returned with the generated success message. Otherwise, an error message showing proper note command syntax is thrown asCommandException. -
If the command syntax was valid and
VEventwas removed from theEventRecord,LogicManagercallsStorage#saveEventRecord(ReadOnlyEventRecord eventRecord)which saves the new notes record in JSON format after serializing it using theJsonEventRecord.
The following is a sample sequence diagram of the EventDeleteCommand. Other commands under the notes feature follow a similar program flow; their diagrams have been omitted for brevity.
4.10.6. View event command
This command changes the mode which the EventSchedulePanel is in. The command has 2 optional parameters being targetViewDateTime
and eventScheduleViewMode. The EventScheduleViewMode enum is used to represent the the skins of the iCalendarAgenda: weekly and daily.
The targetViewDateTime sets the reference date time to be rendered in iCalendarAgenda, which will in turn
show the corresponding week (if it is in week mode) which contains the reference date time. Otherwise, in daily mode, it will simply show
the VEvents for that day.
Implementation
The following is a detailed explanation of the operations EventDeleteCommand performs.
-
The
EventViewCommand#execute(Model model)method is executed. If thetargetViewDateTimeis not null, theModel#setEventScheduleTargetDateTime(LocalDateTime targetDateTime)method will be called to store thetargetViewDateTimein theEventSchedulePrefsobject in theModelManager. If theeventScheduleViewModeis not null, theModel#setEventScheduleViewMode(EventScheduleViewMode eventScheduleViewMode)method will be called to store theeventScheduleViewModein theEventSchedulePrefsobject in theModelManager. -
A new
CommandResultwith typeCommandResultType.SHOW_SCHEDULEwill be generated and returned. -
Upon detecting the
CommandResultType.SHOW_SCHEDULEinMainWindow, it will callhandleSchedulewhich will callLogic#getScheduleViewMode()andLogic#getEventScheduleTargetDateTime()to get the respective data and set them accordingly in theeventSchedulePanelto be rendered to the user.
The EventSchedulePrefs object is used to store the preference of the user for the iCalendarAgenda.
Specifically the skin mode and the reference date time.
|
4.10.7. Screenshot event command
This command allows the user to take a screenshot of the current state of the EventSchedulePanel and save it to a .png file.
Implementation
The following is a detailed explanation of the operations EventScreenshotCommand performs.
-
The
EventScreenshotCommand#execute(Model model)method is executed. This simply returns a newCommandResultwith typeCommandResultType.SCHEDULE_SCREENSHOTandtargetPrintableFileNamefromModel#getEventSchedulePrefString() -
The
MainWindowwhich detects that theCommandResultis of typeCommandResultType.SCHEDULE_SCREENSHOTwill callMainWindow# handleScheduleScreenshot(String targetPrintableFileName). -
Within the
MainWindow# handleScheduleScreenshot(String targetPrintableFileName)it will then open a new full-screen window of the currentEventSchedulePaneland get itsWritableImage. Then it will construct a newSchedulePrintablewith thetargetPrintableFileNameandWritableImageand calllogic#savePrintable(NjoyPrintable printable). -
If successful, this will save the
EventSchedulePanelas .png file type in the printable directory with file nametargetPrintableFileName
The Model#getEventSchedulePrefString() method gets the a string representation of the current state of the Event Schedule Panel.
This is to allow user to easily identify what the .png screenshot represents.
|
The NjoyPrintable object is used to encapsulate the WritableImage of the JavaFX Node to be saved and the file name to save it to.
|
4.10.8. Export event command
This command allows the user to export all the events into a .ics file.
Implementation
The following is a detailed explanation of the operations EventScreenshotCommand performs.
-
The
EventExportCommand#execute(Model model)method is executed. This simply returns a newCommandResultwith typeCommandResultType.EXPORT_CALENDAR -
When the
LogicManagerdetects thatCommandResultTypeis equals toCommandResultType.EXPORT_CALENDAR, it wil then callStorage#exportEvent(ReadOnlyVEvents eventRecord)which in turn callsIcsEventExport#exportEvent(ReadOnlyVEvents eventRecord)to export the events. -
Validation is done to check if the "export" directory exists within the
IcsEventExport#exportEvent(ReadOnlyVEvents eventRecord)method. The directory will be created if it doesn’t exist. -
Contents of the .ics file is generated by loading the
VEventsinReadOnlyVEventsinto aVCalendarobject from theiCalendarAgendalibrary and calling itstoString()method. Which formats the VEvents details into .ics format. Then the contents are written into the .ics file with file name as specified inEVENT_SCHEDULE_FILE_NAMEinIcsEventExport
| This command will overwrite any previously created .ics files from the export command in the exports directory. |
4.11. Logging
We are using java.util.logging package for logging. The LogsCenter class is used to manage the logging levels and logging destinations.
-
The logging level can be controlled using the
logLevelsetting in the configuration file (See Section 4.12, “Configuration”) -
The
Loggerfor a class can be obtained usingLogsCenter.getLogger(Class)which will log messages according to the specified logging level -
Currently log messages are output through:
Consoleand to a.logfile.
Logging Levels
-
SEVERE: Critical problem detected which may possibly cause the termination of the application -
WARNING: Can continue, but with caution -
INFO: Information showing the noteworthy actions by the App -
FINE: Details that is not usually noteworthy but may be useful in debugging e.g. print the actual list instead of just its size
4.12. Configuration
Certain properties of the application can be controlled (e.g user prefs file location, logging level) through the configuration file (default: config.json).
5. Documentation
Refer to the guide here.
6. Testing
Refer to the guide here.
7. Dev Ops
Refer to the guide here.
Appendix A: Product Scope
Target user profile:
-
Has a need to manage classes of students
-
Prefer desktop apps over other types
-
Can type fast
-
Prefers typing over mouse input
-
Is reasonably comfortable using CLI apps
-
Has a need to create questions easily
-
Has a need to generate quizzes with previously created questions
-
Requires a timetable manager
-
Prefers efficient viewing statistics of students rather than manually computing it
Value proposition: Manage classes of students faster than a typical mouse/GUI driven app
Appendix B: User Stories
Priorities: High (must have) - * * *, Medium (nice to have) - * *, Low (unlikely to have) - *
| Priority | As a … | I want to … | So that I can… |
|---|---|---|---|
|
new user |
see usage instructions |
refer to instructions when I forget how to use the App |
|
teacher |
manage classes virtually |
have more time for other duties |
|
teacher |
add a student |
deal with possible changes |
|
teacher |
remove a student |
deal with possible changes |
|
teacher |
mark attendance |
ensure the student was present for class |
|
teacher |
record scores |
tally the marks accurately instead of manually inputting them into the system |
|
teacher |
store questions that I have prepared |
I can refer to them in the future |
|
teacher |
start an in-class activity with my students |
interact more with my students |
|
teacher |
have the option to format the questions as either MCQ or Open Ended |
have different types of questions |
|
teacher |
generate quizzes with randomised questions for assignments |
students are unable to copy solutions from one another |
|
teacher |
the generated quizzes to be in a text document |
easily print and distribute them to students |
|
teacher |
find a student by name |
locate details of students without having to go through the entire list |
|
teacher |
add a student |
deal with possible changes |
|
teacher |
keep notes |
have reminders for pending tasks |
|
teacher |
prioritize my notes |
see the notes that are urgent to me |
|
teacher |
generate score statistics |
easily view class performance and identify weaker students |
|
teacher |
print my statistics reports |
keep a log of individual student performance over the year |
|
student |
view the teacher’s schedule |
request for consultations in appropriate slots |
|
student |
view my past results |
track my progress and check for updates |
|
student |
have an editable timetable |
view my timetable and request for consultations at appropriate slots when the teacher is free |
|
teacher |
have an editable timetable |
view my timetable and let students request for consultations at appropriate slots when I am free |
Appendix C: Use Cases
(For all use cases below, the System is Njoy and the Actor is the Teacher, unless specified otherwise)
Use case: Add a student (UC01)
MSS
-
Teacher enter details of student
-
Njoy saves the record of the student
Use case ends.
Extensions
-
1a. Missing student details
-
1a1. Njoy shows error message.
Use case resumes at step 1.
-
Use case: Edit a student (UC02)
Preconditions
-
User exist in the system
MSS
-
Teacher finds a student (UC05)
-
Teacher requests to edit a student details
-
Njoy returns list of fields able to edit
-
Teacher enter the field to edit
-
Njoy save the edited record
Use case ends.
Extensions
-
*a. Teacher chooses to cancel the edit
Use case ends.
Use case: Delete a student (UC03)
Preconditions
-
User exist in the system
MSS
-
Teacher finds a student (UC05)
-
Teacher requests to delete a student
-
Njoy request for confirmation
-
Teacher confirms the deletion
-
Njoy deletes the student
Use case ends.
Extensions
-
3a. Teacher chooses not to delete the student
Use case ends.
Use case: Find a student (UC04)
MSS
-
Teacher enter name of student to find
-
Njoy display the student details
Use case ends.
Extensions
-
1a. Name of student cannot be found
-
1a1. Njoy shows error message
Use case resumes at step 1.
-
Use case: Create a class (UC05)
MSS
-
Teacher enter new class details
-
Njoy saves the new class
Use case ends.
Extensions
-
1a. Class name already taken
-
1a1. Njoy shows error message
Use case resumes at step 1.
-
Use case: Edit a class (UC06)
Preconditions
-
Class exist in the system
MSS
-
Teacher requests to edit class description
-
Teacher enters new class description
-
Njoy save the edited record
Use case ends.
Extensions
-
*a. Teacher chooses to cancel the edit
Use case ends.
Use case: Delete a class (UC07)
Preconditions
-
Class exist in the system
MSS
-
Teacher requests to delete a class
-
Njoy request for confirmation
-
Teacher confirms the deletion
-
Njoy deletes the class
Use case ends.
Extensions
-
2a. Teacher chooses not to delete the class
Use case ends.
Use case: Add student to class (UC08)
Preconditions
-
User exist in the system
-
Class exist in the system
MSS
-
Teacher requests to add a student to class
-
Njoy adds the student to the class
Use case ends.
Use case: Remove student from class (UC09)
Preconditions
-
User exist in the system
-
Class exist in the system
MSS
-
Teacher requests to remove a student from class
-
Njoy request for confirmation
-
Teacher confirms the deletion
-
Njoy remove the student from the class
Use case ends.
Extensions
-
2a. Teacher chooses not to remove the student from the class
Use case ends.
Use case: Schedule events (UC10)
MSS
-
Teacher requests to add an item to the calendar
-
Teacher enter details of the item
-
Njoy save the item
Use case ends.
Extensions
-
2a. Missing item details
-
2a1. Njoy shows error message.
Use case resumes at step 2.
-
-
2b. Invalid class id
-
2b1. Njoy shows error message.
Use case resumes at step 2.
-
Use case: View events (UC11)
MSS
-
Teacher requests for the events in
-
Njoy returns list of events in the calendar
Use case ends.
Extensions
-
2a. List is empty
Use case ends.
Use case: Delete events on calendar (UC12)
Preconditions
-
Item exist in calendar
MSS
-
Teacher list events in calendar (UC11)
-
Teacher request to delete item in calendar
-
Njoy request for confirmation
-
Teacher confirms the deletion
-
Njoy remove the item from the calendar
Use case ends.
Extensions
-
2a. Teacher chooses not to remove the item from the timetable
Use case ends.
Use case: Creating a Open Ended question (UC13)
MSS
-
Teacher enter topic and answers to the question
-
Njoy save the question
Use case ends.
Extensions
-
1a. Teacher did not enter answers
-
1a1. Njoy shows error message.
Use case resumes at step 1.
-
-
1b. Teacher did not enter topic
-
1b1. Njoy shows error message.
Use case resumes at step 1.
-
Use case: Creating a MCQ question (UC14)
MSS
-
Teacher enter topic and answers to the question and options for MCQ.
-
Njoy save the question
Use case ends.
Extensions
-
1a. Teacher did not enter answers
-
1a1. Njoy shows error message.
Use case resumes at step 1.
-
-
1b. Teacher did not enter topic
-
1b1. Njoy shows error message.
Use case resumes at step 1.
-
-
1c. Teacher did not enter options to the question
-
1c1. Njoy shows error message.
Use case resumes at step 1.
-
Use case: Start a slideshow (UC15)
MSS
-
Teacher selects question to add to slideshow.
-
Njoy displays the questions selected
Use case ends.
Extensions
-
1a. Teacher did not enter correct question number.
-
1a1. Njoy shows error message.
Use case resumes at step 1.
-
-
1b. Teacher did not select and questions.
-
1b1. Njoy shows error message.
Use case resumes at step 1.
-
Use case: Make notes (UC16)
MSS
-
Teacher requests to make a note.
-
Teacher enters specifications of the note.
-
Njoy saves the item and displays the new record.
Use case ends.
Extensions
-
2a. Njoy detects missing or invalid specifications.
-
2a1. Njoy shows error message.
Use case ends.
-
Use case: Edit notes (UC17)
MSS
-
Teacher requests to edit a note.
-
Teacher enters specifications of the edited note.
-
Njoy saves the item and displays the new record.
Use case ends.
Extensions
-
2a. Njoy detects missing or invalid specifications.
-
2a1. Njoy shows error message.
Use case ends.
-
Use case: Delete notes (UC18)
MSS
-
Teacher requests to delete a note.
-
Teacher enters specifications of the note to delete.
-
Njoy removes the item and displays the new record.
Use case ends.
Extensions
-
2a. Njoy detects invalid specifications.
-
2a1. Njoy shows error message.
Use case ends.
-
Use case: List notes (UC19)
MSS
-
Teacher requests to list notes to view.
-
Njoy displays the list of notes record.
Use case ends.
Use case: Sort notes (UC20)
MSS
-
Teacher requests to sort the notes by priority.
-
Njoy displays the list of sorted notes record.
Use case ends.
Use case: Generate Statistics (UC21)
MSS
-
Teacher requests to generate statistics report.
-
Teacher enters specifications of the data file.
-
Njoy reads the data file and generates statistics to show.
Use case ends.
Extensions
-
2a. Njoy detects invalid specifications of the data file or request.
-
2a1. Njoy shows error message.
Use case ends.
-
Use case: Save Statistics Report (UC22)
MSS
-
Teacher generates a statistics report (UC19).
-
Teacher goes to the directory where report is saved.
-
Teacher sees the saved statistics report.
Use case ends.
Appendix D: Non Functional Requirements
-
Should work on any mainstream OS as long as it has Java
11or above installed. -
Should be able to hold up to 1000 students without a noticeable sluggishness in performance for typical usage.
-
A user with above average typing speed for regular English text (i.e. not code, not system admin commands) should be able to accomplish most of the tasks faster using commands than using the mouse.
-
The system should work on both 32-bit and 64-bit environments
-
The assistant should never take more than 5 seconds to process any command
-
The assistant should be usable by any teacher from any academic background without much of a learning curve
-
The teacher should be able to have as many classes as desired
-
The assistant is not required to synchronize timetables / quizzes between 2 teachers
Appendix E: Glossary
MCQ - Multiple Choice Question, a question with four possible answers, and only one correct.
Open Ended - Open Ended Question, a question that cannot be answered with a yes or a no but with a proper sentence.
Timetable - A chart showing the schedule to take place at particular times.
Njoy - A shortened version of the word "Enjoy".
Teacher - User of the Njoy assistant who manages his/her students.
Student - Entity that Teacher manages.
Class - A manageable unit of Student that Teacher can create, read, edit and delete.
GUI or UI - Graphical User Interface that users use to interact with the application.
Appendix F: Product Survey
F.1. Njoy
Pros:
-
Faster than existing market solutions, particularly for Teachers who can type fast.
-
Integrated management of taking attendance, managing classes and creating quizzes as opposed to managing them separately on multiple different platforms.
Cons:
-
Integrated management exists on the PC only, no cloud functionality for management from home.
-
Require understanding of CLI as well as the commands to carry out the functionality of Njoy effectively.
Appendix G: Instructions for Manual Testing
Given below are instructions to test the app manually.
| These instructions only provide a starting point for testers to work on; testers are expected to do more exploratory testing. |
G.1. Launch and Shutdown
-
Initial launch
-
Download the jar file and copy into an empty folder
-
Double-click the jar file
Expected: Shows the GUI with a set of sample contacts. The window size may not be optimum.
-
-
Saving window preferences
-
Resize the window to an optimum size. Move the window to a different location. Close the window.
-
Re-launch the app by double-clicking the jar file.
Expected: The most recent window size and location is retained.
-
G.2. Questions
-
Adding a question to the question list.
-
Test case:
question question/What are the multiples of 10? answer/ 10, 20, 30, 40, 50, … type/open
Expected: Adds a new Open Ended question to the question list. -
Test case: `question question/What is 30 + 20? answer/50 type/mcq a/30 b/40 c/50 d/60 `
Expected: Adds a new MCQ question to the question list. -
Test case:
question question/ answer/ type/
Expected: Shows error message of missing keywords. -
Other incorrect commands to try:
question question/Test question answer/ type/,question question/Test question answer/Test answer type/mcq
Expected: Shows error message regarding reason for failure.
-
-
Editing a question from the question list.
-
Prerequisites: At least one question has to be in the question list.
-
Test case:
question 1 question/What are the multiples of 20? answer/ 20, 40, 60, 80, …
Expected: Edits the first question topic and answer. -
Test case: `question 1 type/mcq a/30 b/40 c/50 d/60 `
Expected: Changes the first question type. -
Test case:
question 1 type/mcq
Expected: Shows error message of missing options. -
Other incorrect commands to try:
question 0 question/Test question,question 1 question/
Expected: Shows error message regarding reason for failure.
-
-
Deleting a question from the question list.
-
Prerequisites: At least one question has to be in the question list.
-
Test case:
question delete 1
Expected: Deletes the first question. -
Test case:
question delete 0
Expected: Shows error message of invalid index. -
Test case:
question delete -1,`
Expected: Shows error message of invalid index.
-
-
Listing questions.
-
Test case:
question list
Expected: Lists the questions stored.
-
-
Finding questions
-
Prerequisites: Question list has to contain a question 'What is 1+1?'.
-
Test case:
question find/What is 1+1?
Expected: Lists the question that matches the search term. -
Test case:
question find/Whxt is 1+1?
Expected: Lists the question that is similar to the search term. -
Test case:
question find/What is
Expected: Lists the question that is similar to the search term. -
Test case:
question find/Last digit of pi?
Expected: Return zero results. -
Test case:
question find/
Expected: Shows error message of empty search.
-
-
Starting a slideshow
-
Prerequisites: Question list has to contain at least one question.
-
Test case:
question slideshow 1
Expected: Opens a fullscreen window with question prompt. -
Test case:
question slideshow
Expected: Shows error message of having no index defined. -
Other incorrect add commands to try:
question slideshow 2 3,question slideshow a
Expected: Shows error message of having invalid indexes.
-
G.3. Notes
| The test cases for this part are meant to be independent of each other. If there are existing data that causes the command to fail through purposeful or intended, validation, testers are expected to change to fields to attain the expected result.(e.g. to maintain the unique property of notes title et cetera) |
-
Adding a note in the notes panel.
-
Test case:
note note/Tuesday desc/Grade 6A prelim papers priority/high
Expected: Adds a new note to the notes list panel. Has red panel color to denote high priority. -
Test case:
note note/Tuesday afternoon desc/prepare lectures
Expected: Adds a new note to the notes list panel. Has grey panel color to denote unmarked or default priority. -
Test case:
note note/ desc/Grade 6A prelim papers
Expected: Shows error message of correct command syntax. -
Other incorrect add commands to try:
note note/new note desc/,note note/invalid priority desc/shows error priority/middle
Expected: Shows error message regarding reason for command failure or the correct command syntax.
-
-
Editing an existing note in the notes panel.
-
Prerequisites: The notes panel has some notes listed in the panel. New note properties do not have the same title as an existing note.
-
Test case:
note 1 note/changed note title
Expected: First note in the list changes note title to “changed note title”. Shows success message of edited note. -
Test case:
note 1 note/other title desc/new description priority/high
Expected: First note in the list changes properties to the fields specified. This is provided that the first note do not have these exact same properties, and no other note has the same title. -
Test case:
note 1
Expected: Shows error message to tell user that at least one field is to be provided. -
Other incorrect edit commands to try:
note 1 note/duplicate note title(some other note has this “duplicate note title”),note 0 note/note one
Expected: Shows appropriate error messages of why the command failed.
-
-
Deleting a note in the notes panel.
-
Prerequisites: The notes panel has some notes listed in the panel.
-
Test case:
note delete 1
Expected: First note is deleted from the list. Details of the deleted note shown in the status message. Notes panel is updated. -
Test case:
note delete 0
Expected: No note is deleted. Error details shown in the status message. No change observed in the notes panel. -
Other incorrect delete commands to try:
note delete,note delete x(where x is larger than the list size),note delete one
Expected: Shows appropriate error messages of why the command failed.
-
-
Listing notes in the notes panel to see the full description.
-
Prerequisites: The notes panel has some notes listed in the panel.
-
Test case:
note list
Expected: A string representation of the notes list is shown in the status result. No change observed in the side panel. -
Test case:
note list 0
Expected: Shows appropriate error messages of why the command failed. -
Other incorrect list commands to try:
note sort list,note 1 list
Expected: Shows appropriate error messages of why the command failed.
-
-
Sorting notes in the notes panel by priority.
-
Prerequisites: The notes panel has some notes listed in the panel.
-
Test case:
note sort
Expected: Side panel has the list sorted in order of priority (in the order red, yellow, green, grey). -
Test case:
note sort 0
Expected: Shows appropriate error messages of why the command failed. -
Other incorrect sort commands to try:
note sort list,note 1 sort
Expected: Shows appropriate error messages of why the command failed.
-
G.4. Statistics
-
Generating a Statistics report.
-
Prerequisites: Tester has test excel files to test. The test files are to follow the data file specifications as mentioned in the User Guide. Some sample excel files to test has been provided here.
-
Prerequisites: Once the test files have been downloaded or created, testers are assumed to know how to retrieve the correct relative or full file path of the test file(s).
-
Test case:
statistics file/{some valid file path} print/MyTestReport
Expected: Generates a statistics report in a new window. Image file of type png is saved to the printable directory with name MyTestReport. -
Test case:
statistics file/{some invalid file path} print/MyTestReport
Expected: If the statistics report is not generated, the command result shows the reasons for failure. Otherwise, it can be verified that the statistics report generated has erroneous data or ineffective descriptive statistics as mentioned in the User Guide as a result of the failure to follow data specifications. -
Test case:
statistics file/{some valid file path} print/{invalid file name}. Examples of illegal characters in file name include /, ? and *.
Expected: Shows error message of reasons for failure.
-
G.5. Student
-
Adding a student to the student list.
-
Prerequisites: The student list already already contains one student "Test Student".
-
Test case:
student name/New Student
Expected: Adds student "New Student" to the list of students. -
Test case:
student name/Test Student
Expected: Shows error message that a student with the same name already exists in the student list. -
Test case:
student name/2231
Expected: Shows error message that student names can only contain alphabets and spaces. -
Test case:
student name/Test StudentTwo tag/Tag
Expected: Adds student "Test StudentTwo" with tag "Tag" -
Other incorrect add commands to try:
student name/new student tag/,student name/new student tag/tag with space
Expected: Shows error message regarding reason for command failure or the correct command syntax.
-
-
Editing an existing student in the student list.
-
Prerequisites: The student list contains two students. "Test One" at index one and "Test Two" at index two.
-
Test case: `student 1 name/changed name `
Expected: First Student in the student list is edited to "Test One" -
Test case:
student 1 name/Test Two
Expected: Error message stating that "Test Two" already exists in the student list is shown. -
Test case:
student 0 name/Test Zero
Expected: Shows error message that index provided is not valid. -
Test case:
student 5 name/Test Five
Expected: Shows error message that index provided is out of bounds.
-
-
Deleting a student from the student list.
-
Prerequisites: The student list has one student at index 1.
-
Test case:
student delete 1
Expected: First student is deleted from the list. -
Test case:
student delete 0
Expected: Error message stating that index is invalid is shown -
Test case:
student delete 5
Expected: Error message stating that index is out of bounds is shown.
-
-
Listing students in the student panel.
-
Prerequisites: The student list is populated with some students.
-
Test case:
student list
Expected: A string representation of the student list is shown in the status result.
-
G.6. Tag
-
Adding a tag to a student in the student list.
-
Prerequisites: The student list already already contains one student "Test Student".
-
Test case:
tag index/1 tag/Tag
Expected: Adds tag "Tag" to the student in the student list. -
Test case:
tag index/0 tag/Tag
Expected: Shows error message that the index is not valid. -
Test case:
tag index/5 tag/Tag
Expected: Shows error message that the index is out of bounds. -
Test case:
tag index/1 tag/Tag@
Expected: Shows error message that tags can only contain alphanumeric characters -
Other incorrect add commands to try:
tag index/1 tag/,tag index/ tag/,tag index/1 tag/tag space
Expected: Shows error message regarding reason for command failure or the correct command syntax.
-
G.7. Mark
-
Adding a mark to a student in the student list.
-
Prerequisites: The student list already already contains two students, "Marked Student" at index 1, who is already marked, and "Unmarked Student" at index 2, who is not marked.
-
Test case:
mark index/2
Expected: Marks "Unmarked Student" at index 2. -
Test case:
mark index/1
Expected: Shows error message that the student is already marked. -
Test case:
mark index/5
Expected: Shows error message that the index is out of bounds. -
Test case:
mark index/0
Expected: Shows error message that the index is invalid.
-
-
Removing a mark from a marked student in the student list.
-
Prerequisites: The student list already already contains two students, "Marked Student" at index 1, who is already marked, and "Unmarked Student" at index 2, who is not marked.
-
Test case:
mark unmark index/1
Expected: Removes mark from "Marked Student" at index 1. -
Test case:
mark unmark index/2
Expected: Shows error message that the student is not previously marked. -
Test case:
mark unmark index/5
Expected: Shows error message that the index is out of bounds. -
Test case:
mark unmark index/0
Expected: Shows error message that the index is invalid.
-
G.8. Group
-
Creating a group with students in the student list.
-
Prerequisites: The student list already already contains 3 students, and there is already a group with GroupId "G02" present.
-
Test case:
group manual/ groupID/G01 studentNumber/1 2 3
Expected: Creates group "G01" with students 1,2 and 3. -
Test case:
group manual/ groupID/G02 studentNumber/1 2 3
Expected: Shows error message that a group with the same name already exists in the group list. -
Test case:
group manual/ groupID/ studentNumber/1 2 3
Expected: Shows error message that groupID is left empty. -
Test case:
group manual/ groupID/G01 studentNumber/1 2 5
Expected: Shows error message that one or more of the student numbers is out of bounds. -
Other incorrect add commands to try:
group manual/ groupID/G01 studentNumber/,group manual/ groupID/ studentNumber/
Expected: Shows error message regarding reason for command failure or the correct command syntax.
-
-
Adding a student to an already created group.
-
Prerequisites: The student list contains 3 students, and there is already a group with groupID G01, with students 1 and 2.
-
Test case:
group add groupID/G01 studentNumber/3 groupIndexNumber/2
Expected: Third student in student list is added to group "G01", with group index number of 2. -
Test case:
group add groupID/G03 studentNumber/1 groupIndexNumber/2
Expected: Error message stating that group with the groupID does not exist. -
Test case:
group add groupID/G01 studentNumber/5 groupIndexNumber/2
Expected: Shows error message that index provided for the student number is out of bounds. -
Test case:
group add groupID/ studentNumber/ groupIndexNumber/
Expected: Shows error message that one or more fields are left empty. -
Test case:
group add groupID/G01 studentNumber/2 groupIndexNumber/10
Expected: Shows error message that index provided for the group index number is out of bounds.
-
-
Deleting a student from an already created group
-
Prerequisites: The student list contains 3 students, and there is already a group with groupID G01, with students 1 and 2.
-
Test case:
group delete groupID/G01 groupIndexNumber/1
Expected: First student in "G01" is removed from the group -
Test case:
group delete groupID/G03 groupIndexNumber/1
Expected: Error message stating that the group with the groupID does not exist. -
Test case:
group delete groupID/G01 groupIndexNumber/5
Expected: Error message stating that group index number is out of bounds is shown. -
Test case:
group delete groupID/ groupIndexNumber/
Expected: Shows error message that one or more fields are left empty.
-
-
Showing the students from a specific group in the group window.
-
Prerequisites: The student list contains 3 students, and there is already a group with groupID G01, with students 1 and 2.
-
Test case:
group groupID/G01
Expected: A window showing the students in group "G01" pops up. -
Test case:
group groupID/G02
Expected: Error message stating that the group with the groupID does not exist.
-
-
Exporting a group to a word document.
-
Prerequisites: The student list contains 3 students, and there is already a group with groupID G01, with students 1 and 2.
-
Test case:
group export groupID/G01
Expected: A message stating that the group was successfully exported to G01.docx is shown. -
Test case:
group export groupID/G02
Expected: Error message stating that the group with the groupID does not exist.
-
G.9. Event
-
Adding a event to the event list.
-
Prerequisites: The event list already contains one event with event name "Test Event", startDateTime "2019-11-01T03:00" and endDateTime "2019-11-01T04:00". The recurrence type and color number do not matter as long as it is valid.
-
Test case:
event eventName/cs2103 Practical startDateTime/2019-11-15T08:00 endDateTime/2019-11-15T09:00 recur/none color/1
Expected: Adds Event with event name cs2103 Practical to the event list -
Test case:
event eventName/Test Event startDateTime/2019-11-01T03:00 endDateTime/2019-11-01T04:00 recur/none color/1
Expected: Shows error message that will result in duplicate event being created -
Test case:
event eventName/\n
Expected: Shows error message for invalid command. -
Test case:
event eventName/teacher meeting startDateTime/2019-11-15T07:00 endDateTime/2019-11-15T06:00 recur/none color/1
Expected: Shows error message for invalid date range -
Test case:
event eventName/teacher meeting startDateTime/2019-11-15T07:00 endDateTime/2019-11-15T09:00 recur/none color/24
Expected: Shows error message for invalid color number passed. -
Test case:
event eventName/teacher meeting startDateTime/2019-11-15T07:00 endDateTime/2019-11-15T09:00 recur/invalid color/1
Expected: Shows error message for invalid recurrence type passed. -
Other incorrect add commands to try:
event eventName/cs2103 Practical startDateTime/ endDateTime/2019-11-15T09:00 recur/ color/1Expected: Shows error message regarding reason for command failure or the correct command syntax.
-
-
Finding the index of a existing event in the event list
-
Prerequisites: The event list contains one event. The event has event name "First Event", startDateTime "2019-11-01T03:00" and endDateTime "2019-11-01T04:00". The recurrence type and color number do not matter as long as it is valid.
-
Test case:
event indexOf/First Event
Expected: Displays the index and details of the event. -
Test case:
event indexOf/First
Expected: Event was not found but suggests the event with event name "First Event" and displays its index as well as its details. -
Test case:
event indexOf/
Expected: Shows error message, asking user to input a event name to be used in the search.
-
-
Editing an existing event in the event list.
-
Prerequisites: The event list contains two events. The first event with event name "First Event", startDateTime "2019-11-01T03:00" and endDateTime "2019-11-01T04:00" at index one. The second event with event name "Second Event", startDateTime "2019-11-01T03:00" and endDateTime "2019-11-01T04:00"
-
Test case:
event 1 eventName/changed name color/13 recur/daily
Expected: First event in event list changed event name to "changed name", color to 13 and recurrence to daily. -
Test case:
event 1 eventName/Second Event
Expected: Error message stating this will result in duplicate events. -
Test case:
event 0 eventName/valid Event
Expected: Shows error message that index provided is not valid. -
Test case:
event 5 eventName/Test Five
Expected: Shows error message that index provided is out of bounds.
-
-
Deleting a event from the event list.
-
Prerequisites: The event list has one event at index 1.
-
Test case:
event delete 1
Expected: First event is deleted from the list. -
Test case:
event delete 0
Expected: Error message stating that index is invalid is shown -
Test case:
event delete 5
Expected: Error message stating that index is out of bounds is shown.
-
-
Exporting event to .ics file type.
-
Prerequisites: The event list contains one event with with event name "Test Event", startDateTime "2019-11-01T03:00" and endDateTime "2019-11-01T04:00". The recurrence type and color number do not matter as long as it is valid.
-
Test case:
event export
Expected: A message stating that events were successfully exported. And prompts the user to check the export directory.
-
-
Taking a screenshot of the event schedule.
-
Prerequisites: The event list contains one event with with event name "Test Event", startDateTime "2019-11-01T03:00" and endDateTime "2019-11-01T04:00". The recurrence type and color number do not matter as long as it is valid.
-
Test case:
event screenshot
Expected: Opens a full screen window, taking a screenshot fo the event schedule. Then closes it and shows a message indicating the screenshot has successfully been taken.
-
-
Viewing the event schedule.
-
Prerequisites: The event list contains one event with with event name "Test Event", startDateTime "2019-11-01T03:00" and endDateTime "2019-11-01T04:00". The recurrence type and color number do not matter as long as it is valid.
-
Test case:
event view targetDate/2019-11-18 scheduleMode/daily
Expected: Changes the view of the event schedule to daily mode and focuses on the date 18 November 2019. -
Test case:
event view targetDate/2019-99-99 scheduleMode/daily
Expected: Shows error message for invalid date format. -
Test case:
event view targetDate/2019-01-01 scheduleMode/invalid
Expected: Shows error message for invalid schedule view mode. Prompting user to input weekly or daily only.
-